In the fast-paced world of today, efficiency is key, especially when it comes to everyday tasks like grocery shopping, and the iOS 17 Grocery List seems to join many users’ toolboxes very quickly to that end.
With the advent of iOS 17, Apple has made this process even smoother by enhancing the Reminders app. Now, creating a categorized grocery list with priority levels is a breeze. In this article, we will guide you through the steps to optimize your shopping experience on an iPhone running iOS 17.
How to use the iOS 17 Grocery List feature?
Creating a grocery list in the Reminders app is straightforward. All you need to do is create a list and fill it with your items. The app will then categorize your items automatically, and you can also team up with a partner or roommate to plan what you need from the store. Here’s the step-by-step guide below.
Enabling iCloud for reminders

To kick things off, ensure that your Reminders are synced with iCloud. This simple step is often overlooked but crucial for the smooth functioning of the iOS 17 grocery list feature.
- Open Settings on your iPhone and select your profile.
- Tap on iCloud and choose “Show All” under the Apps using iCloud section.
- Toggle on Reminders.
Creating your grocery list
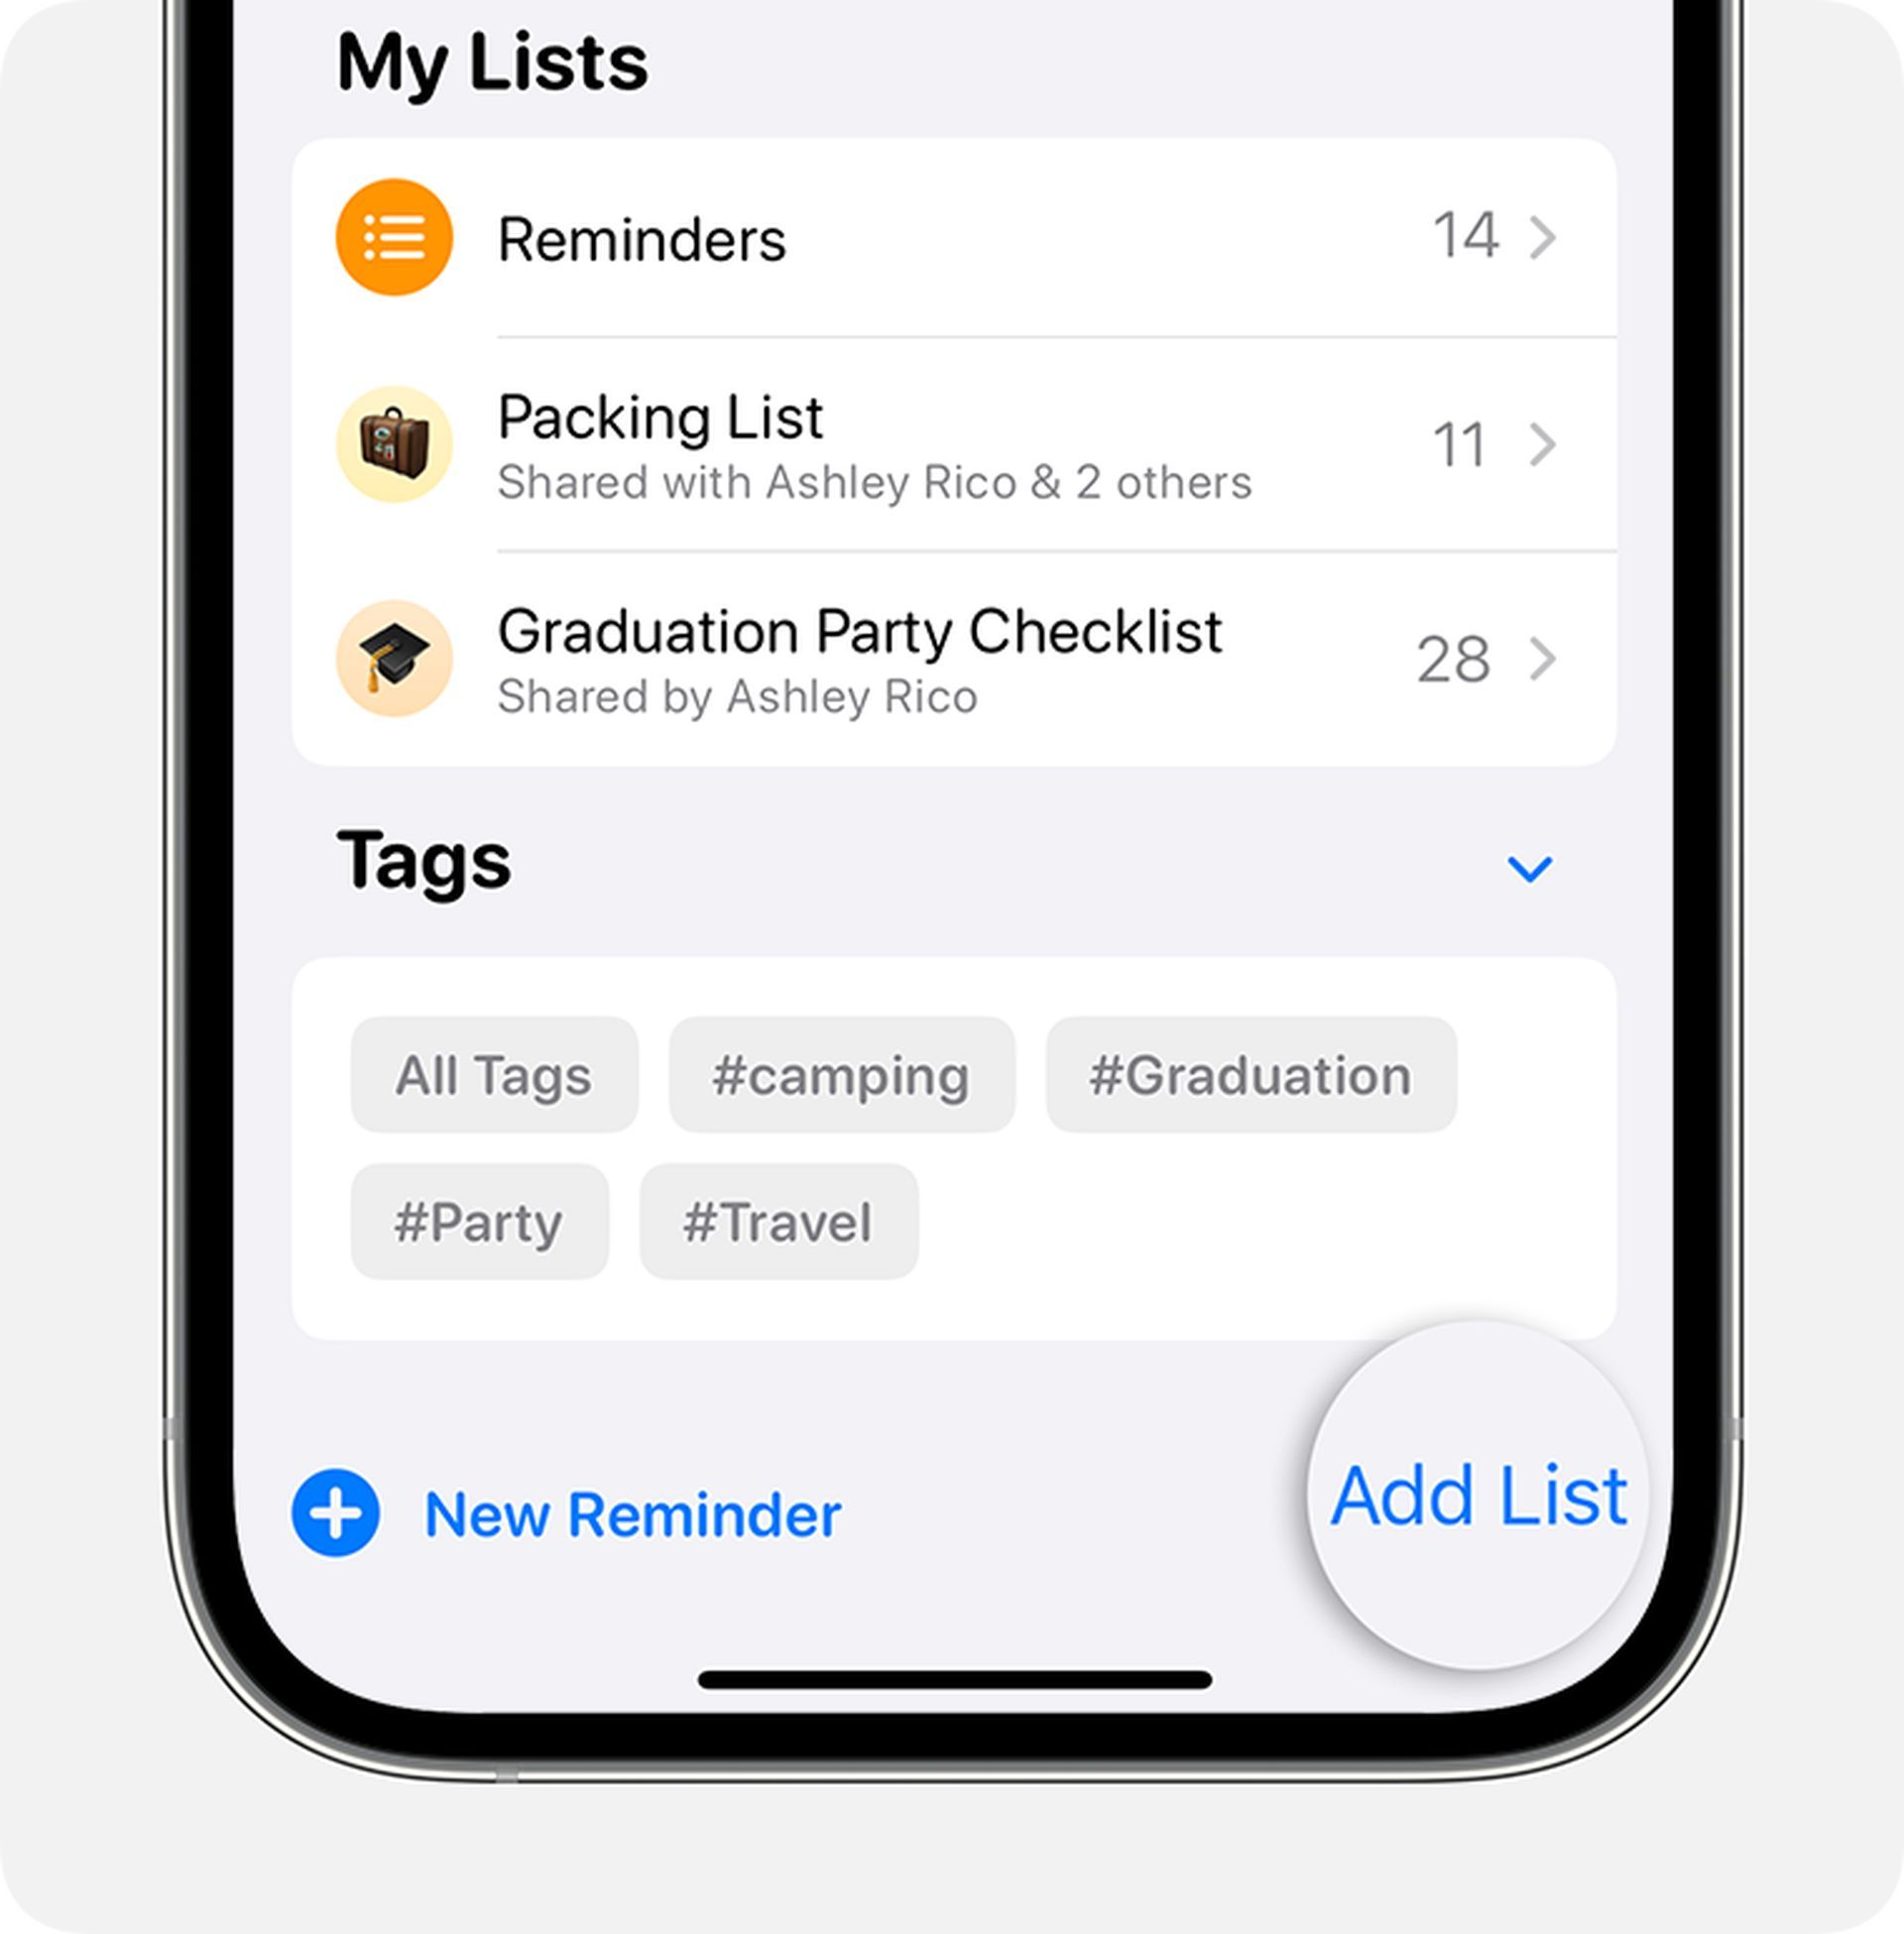
Now that iCloud is set up, let’s dive into the process of creating a grocery list tailored to your needs.
- Launch the Reminders app on your iOS 17 device.
- Tap on “Add List” at the bottom-right corner.
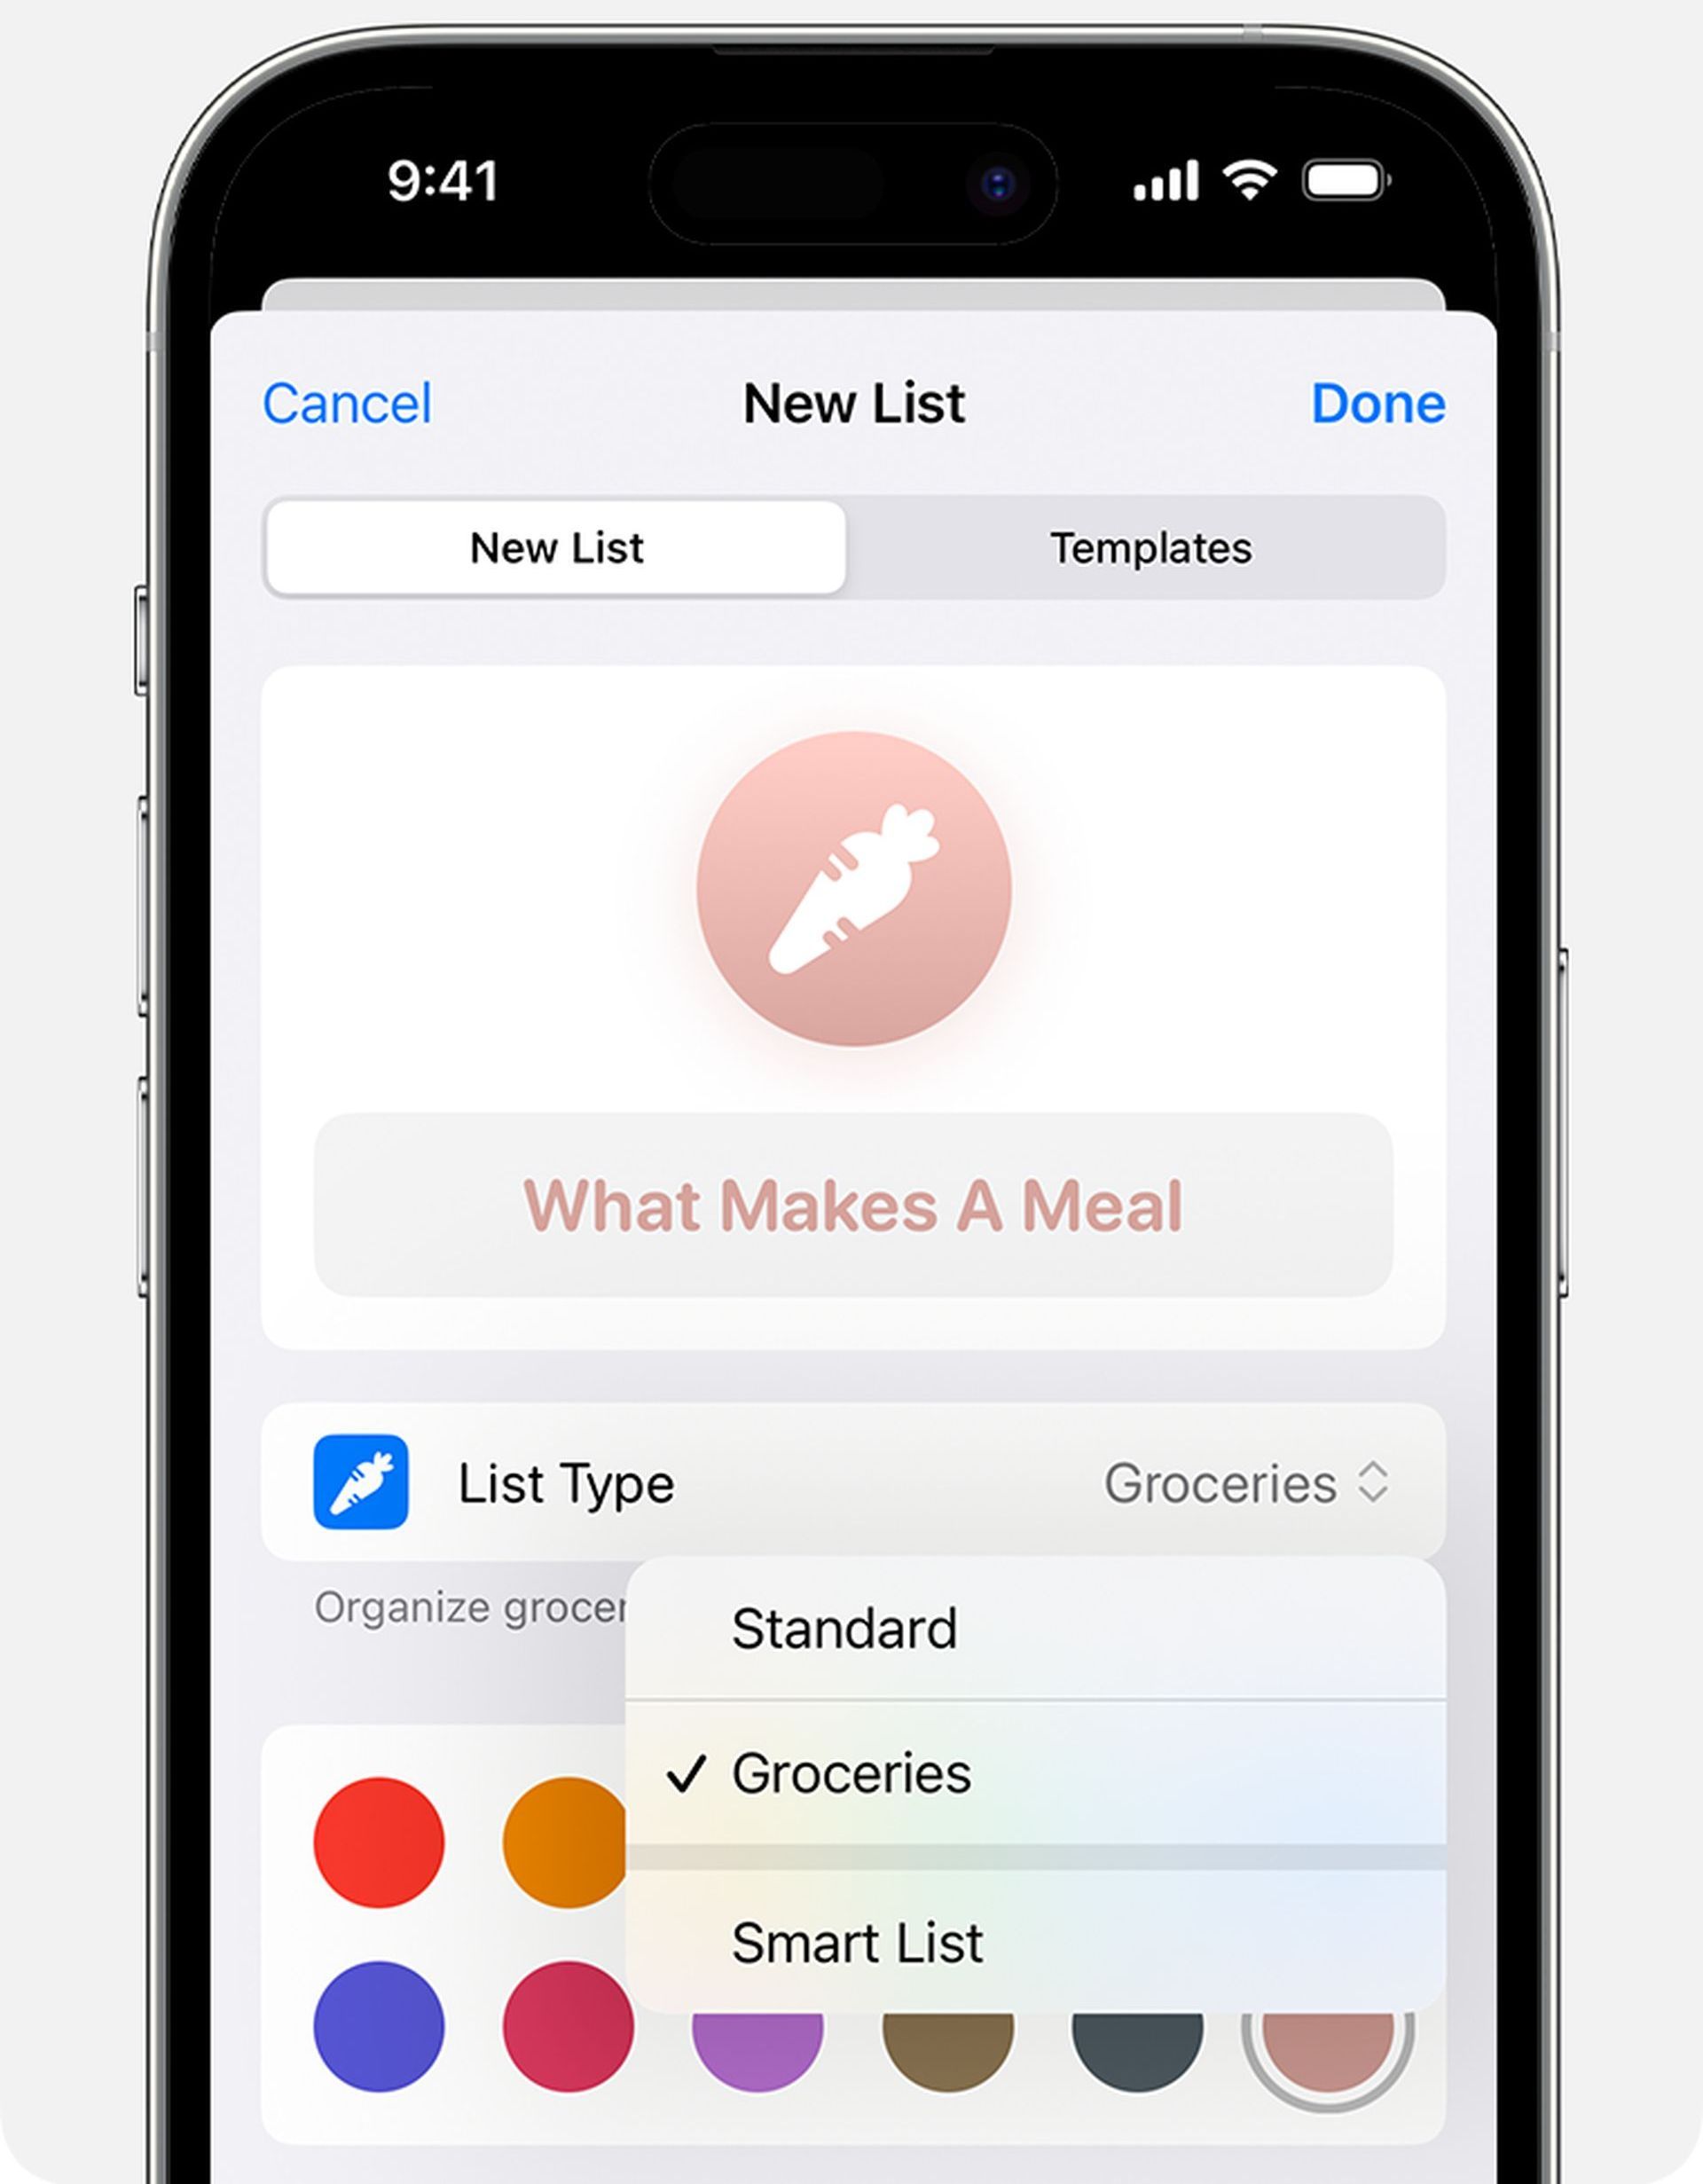
- Customize your list by giving it a name and selecting an icon.
- Under “List Type,” be sure to choose “Groceries” for this feature to work effectively.
- Press “Done” to complete the process.
Populating your list
With your grocery list ready, it’s time to start adding items.
- Select “New Item” from the bottom-left corner.
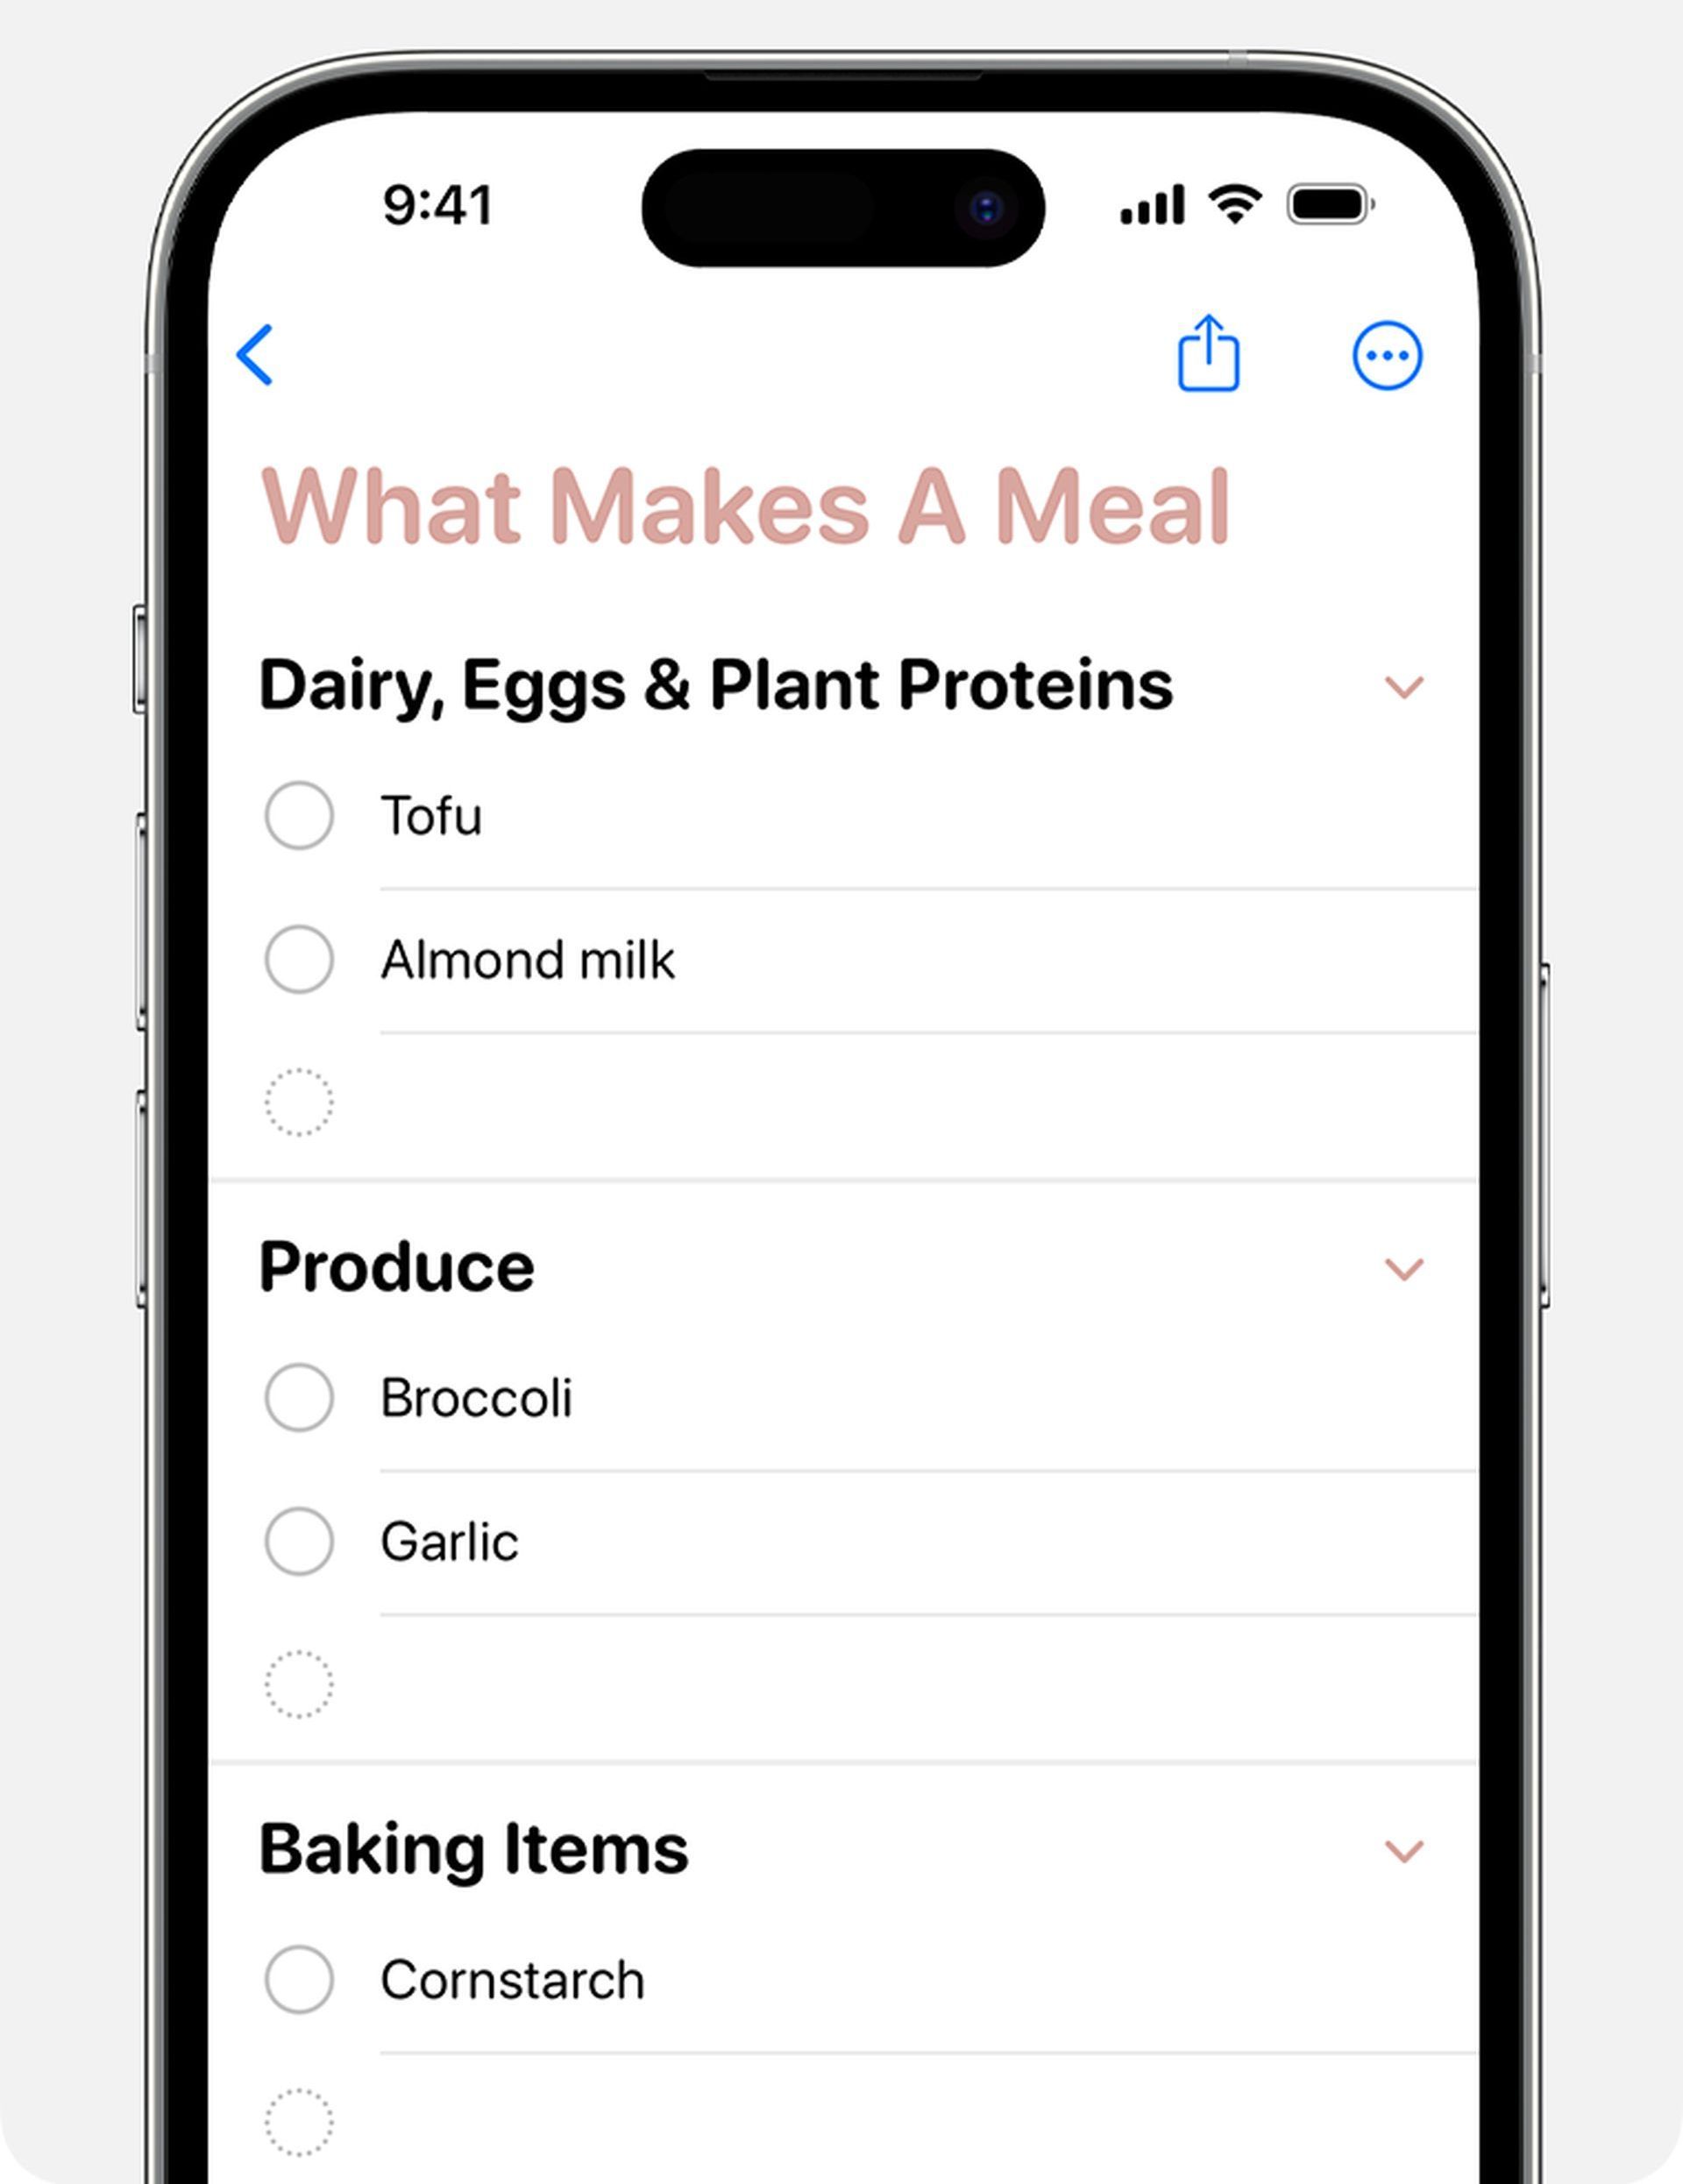
- Begin listing your items. As you do so, the app will intuitively categorize them, making organization a breeze.
Setting priorities
Ensure that you get all your essentials by assigning priorities to items.
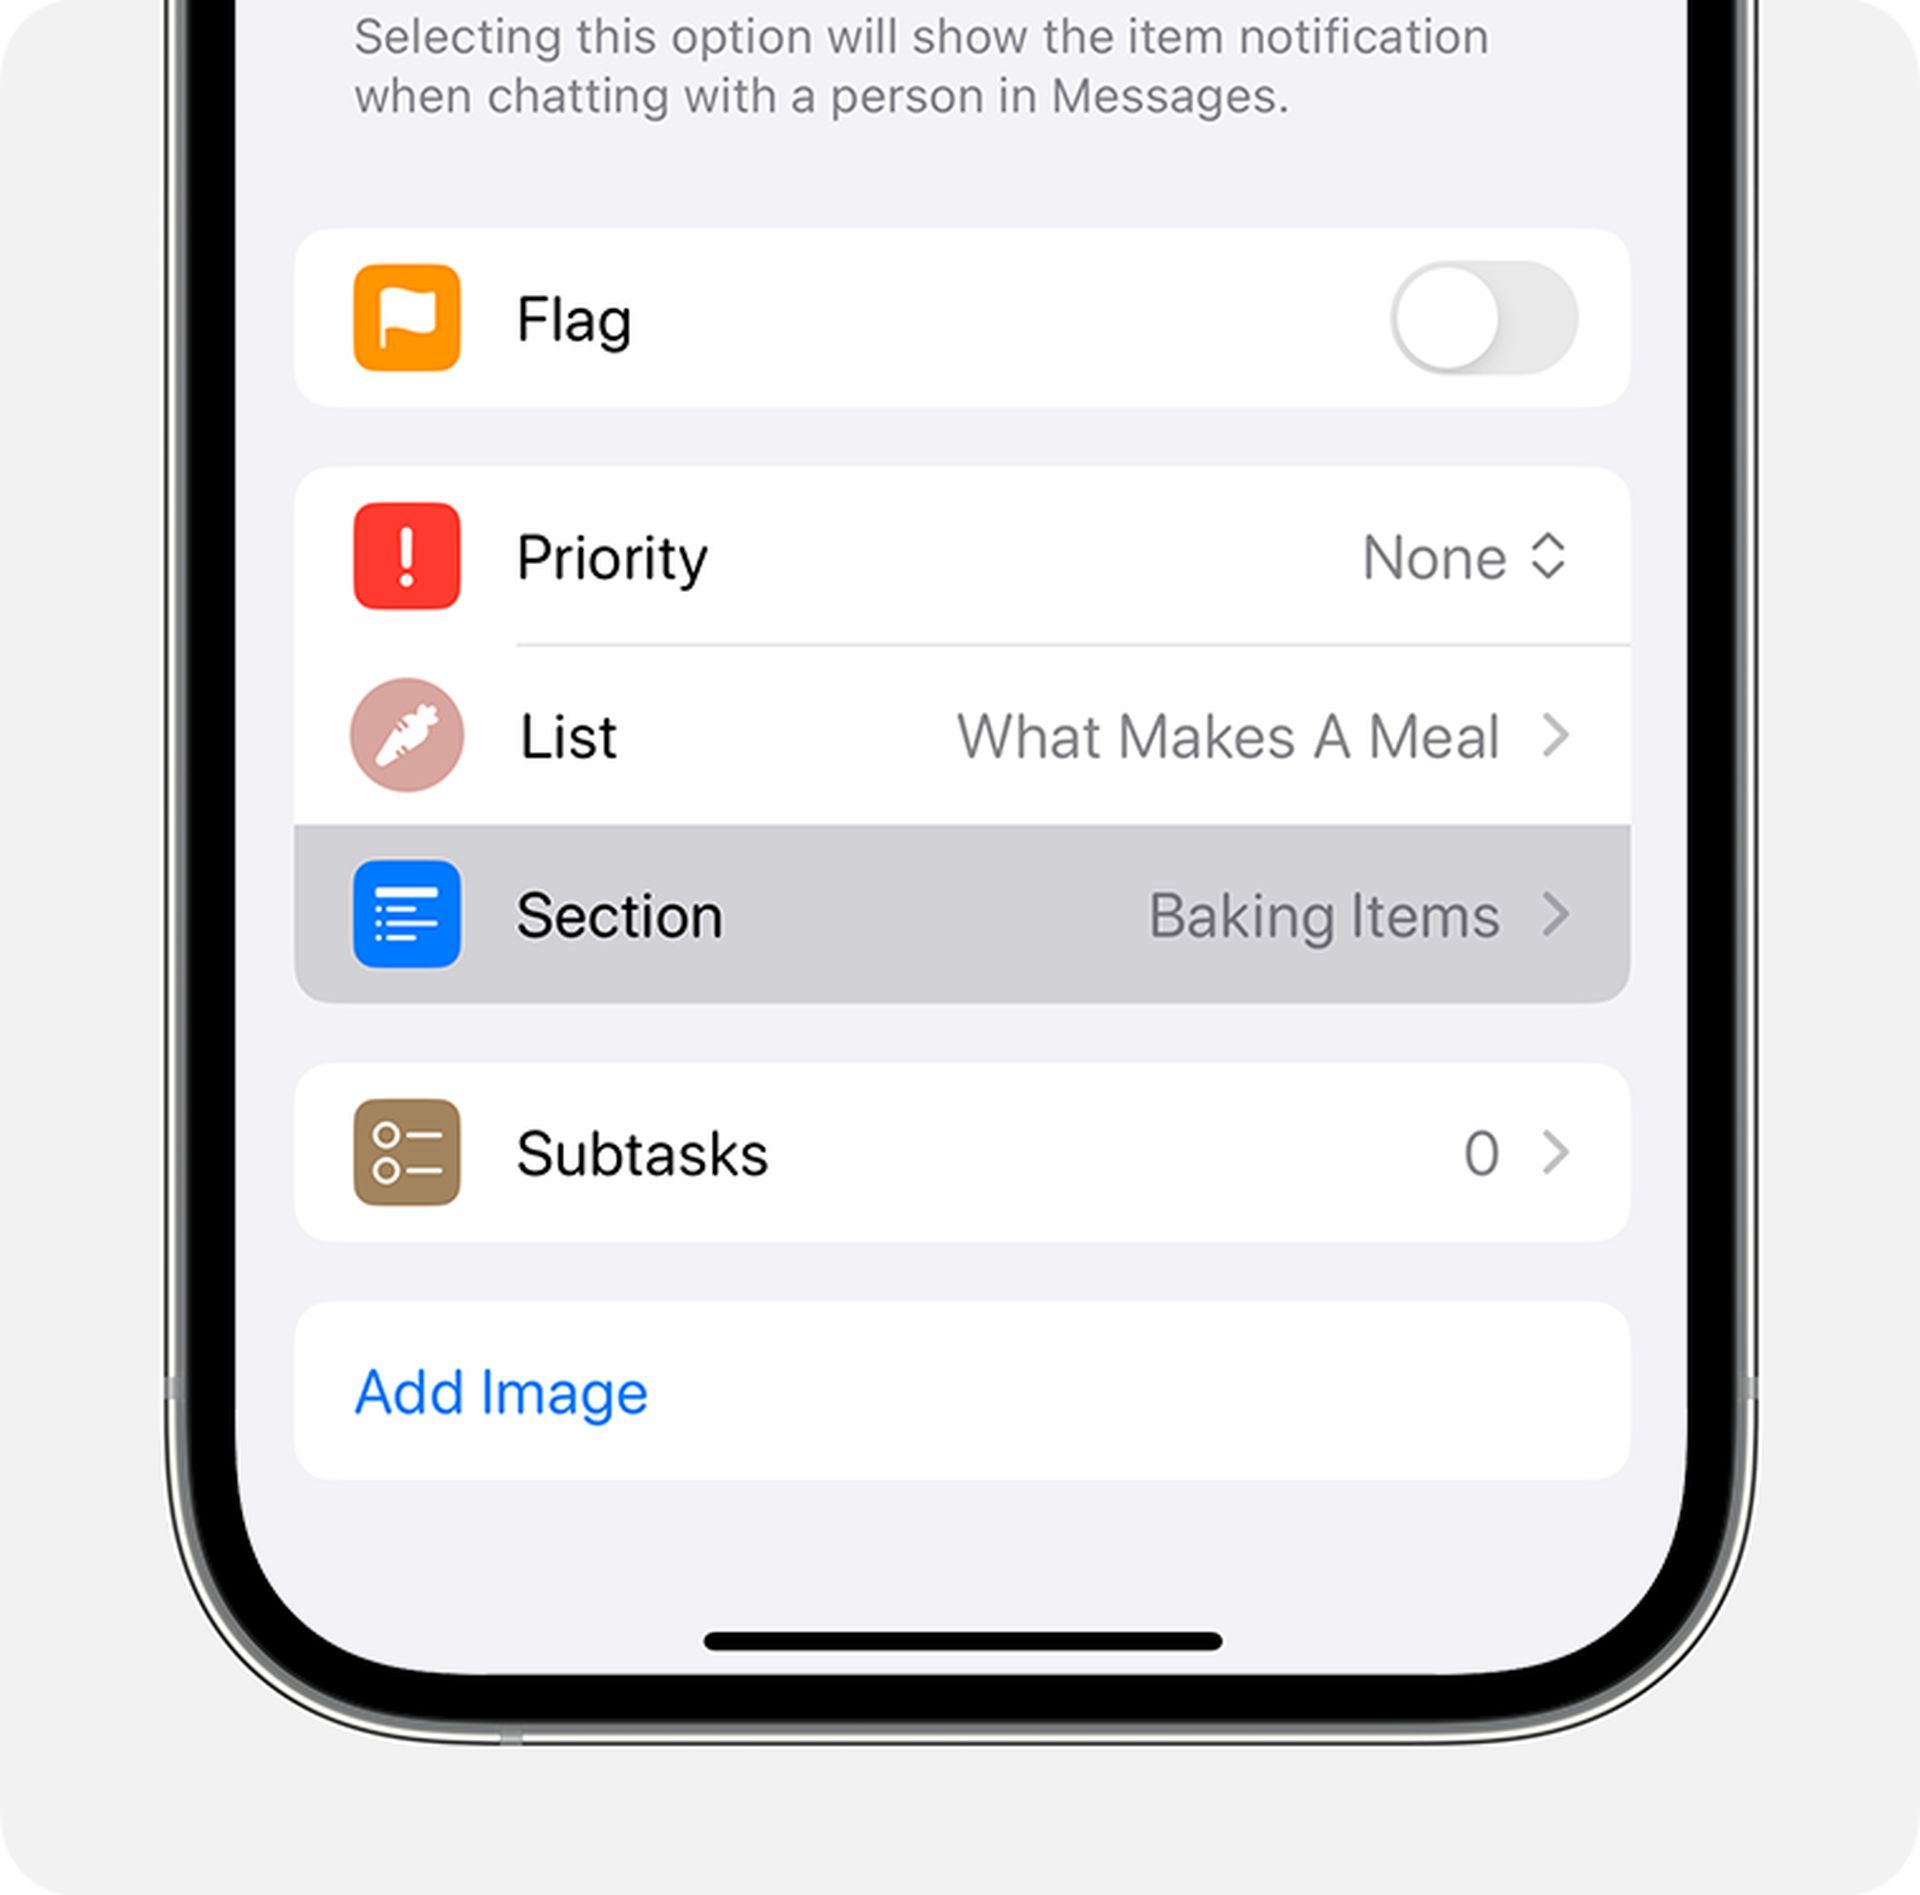
- Tap on an item and click the “i” button.
- Select “Priority” and choose from the options provided. High priority items will be marked with three exclamation symbols.
Customizing categories
While the app does a commendable job categorizing items, you have the freedom to make adjustments.
- Tap on an item that you’d like to re-categorize.
- Click the “i” button and select “Section.”
- Choose a suitable category or create a custom one for a tailored experience.
Choosing a layout
Customize the view of your list to suit your preferences.
- Tap the three dots at the top-left corner.
- Select “View as Columns” for a different perspective.
Sharing your list
Collaboration is made easy with the ability to share your list with others.
- Tap the Share icon at the top of the screen.
- Select the desired contact.
With iOS 17’s upgraded Reminders app, grocery shopping becomes a hassle-free experience. By following these simple steps, you can optimize your list to ensure that you never miss an essential item. You can simply embrace this feature and revolutionize the way you approach your daily shopping needs.
However, as with any app or service, you might occasionally encounter problems with the Reminder app and the iOS 17 Grocery List feature. In such a case, check out below to how you can get rid of an issue with them.
Why is iOS 17 Grocery List not working and how to fix it?
For some users, the iOS 17 Grocery List feature isn’t functioning as expected, leading to frustration. Right below, we’ll delve into the potential reasons behind this issue and provide practical steps to rectify it.
Possible causes for the iOS 17 Grocery List malfunction
These are a couple of potential causes for the problems you might be facing with the iOS 17 Grocery List feature:
- Disabled list type: To have your grocery items automatically sorted, ensure that the list type is set to “Groceries” or “Shopping” within the Reminders app. It’s possible that this setting may have been overlooked or inadvertently changed back to the standard list type.
- iOS 17 bugs: Since iOS 17 is relatively new, it may still contain some unaddressed bugs, particularly if you’re using the beta version. However, even with the final release, the Grocery List issue persists for some users.
How to fix the iOS 17 Grocery List not working issue?
Now, let’s explore some solutions and alternative approaches to ensure your grocery items are sorted automatically as intended by Apple.
Enabling iCloud for Reminders
Apple recommends enabling iCloud for Reminders before using Grocery lists. Follow these steps:
- Open Settings.
- Tap on your name/Apple ID.
- Select iCloud.
- Scroll down and tap “Show All” under “Apps Using iCloud”.
- Turn on the Reminders toggle.
Selecting “Groceries” from List Info
To categorize your grocery items correctly, ensure the list type is set to “Groceries” or “Shopping” in the Reminders app:
- Open the Reminders app.
- Access your grocery list.
- Tap the three-dot icon (More icon) at the top right.
- Select “Show List Info”.
- Confirm the List Type is set to ‘Groceries’. If not, adjust it accordingly.
Creating and syncing from another device
If your List Type is set to “Groceries” but the items aren’t categorizing automatically, it could be due to a glitch in the iOS 17 update on your iPhone. This issue seems to be specific to iPhones. If you already have iCloud for Reminders activated, you can resolve this by creating a Grocery List on another Apple device, which will sync with your iPhone shortly.
For instance, if you have an iPad, you can establish a grocery list there (ensuring the List Type is set to “Groceries”) and let it sync with your iPhone. Once synced, you can continue to edit or add items as usual.
Restart and start fresh
Many have discovered that a straightforward restart can often resolve the Grocery List feature issue. Give your device a restart. However, after the restart, consider initiating a new list instead of working on a previously created one. This allows the feature to reset and begin categorizing your grocery items automatically. To restart your iPhone, follow these steps:
For iPhones with Face ID:
- Press and hold the Side button and one volume button until the power-off slider appears. Slide to power off, then power on again.
For iPhones without Face ID:
- Press and hold the Side button until the power-off slider appears. Slide to power off, then power on again.
Update to iOS 17 Stable
While the problem with Grocery lists initially surfaced in the beta versions of iOS 17, it appears not to have been entirely resolved. Users still face difficulties even with the stable release. Nonetheless, it’s advisable to stay current with the latest versions to promptly receive any necessary bug fixes. To update your iPhone to the stable version of iOS 17, navigate to Settings > General > Software Update and install the latest available iOS update.
Final words
Troubleshooting the iOS 17 Grocery List feature can be a straightforward process with the right steps. By addressing potential issues such as list type settings, iCloud synchronization, and considering alternative devices for list creation, users can ensure their grocery items are efficiently categorized. Additionally, the importance of staying updated with the latest iOS versions cannot be overstated, as it ensures access to vital bug fixes. With these strategies in mind, users can make the most of this convenient feature, streamlining their shopping experience and maximizing the benefits of iOS 17. Happy shopping!
Featured image credit: Apple

