If you don’t know how to create and manage a Discord server in 2022, we are here for you. Discord is a program for text and voice communication geared towards gamers. Its modern and basic appearance makes it an excellent alternative to other programs like Teamspeak and Skype. Discord has taken many design cues from Teamspeak’s vast modability and management capabilities, but some of those options have been hidden within the user interface. Fortunately, we are going to explain it all for those who don’t know.
This application has PC and mobile versions, as well as a web client that you can use directly from the browser. Discord even has a video conferencing feature for free.
How to register and install Discord?
You can register in Discord using any of their clients, but to make it easier we are going to show you how to do it through their website. The process is very basic, the first thing you have to do is to enter discordapp.com, and click on the Login button you will see at the top right.
Click on the Register link that you will see just below the Login button, and that will take you to the process of creating a new account.
This first step is much simpler on the mobile phone since when you start the application for the first time, on the welcome screen you will see the option Register next to the login option without having to click anywhere else.
Here, you must enter an e-mail address, user name, and password, and when you are set just click on Continue.
And that’s it, you can start using Discord. At first, you may be asked to verify your account with a link that you will receive by email.
At this point, now you just need to download the Discord application on all the devices you want. To do this, go to the discordapp.com/download page.
How to create a Discord server in 2022?
Creating a Discord server is simple. To begin, download Discord (Windows, macOS, Linux, iOS, or Android) or access the Discord web interface. To get started, you’ll need to create a free user account. So go ahead and complete all of that first.
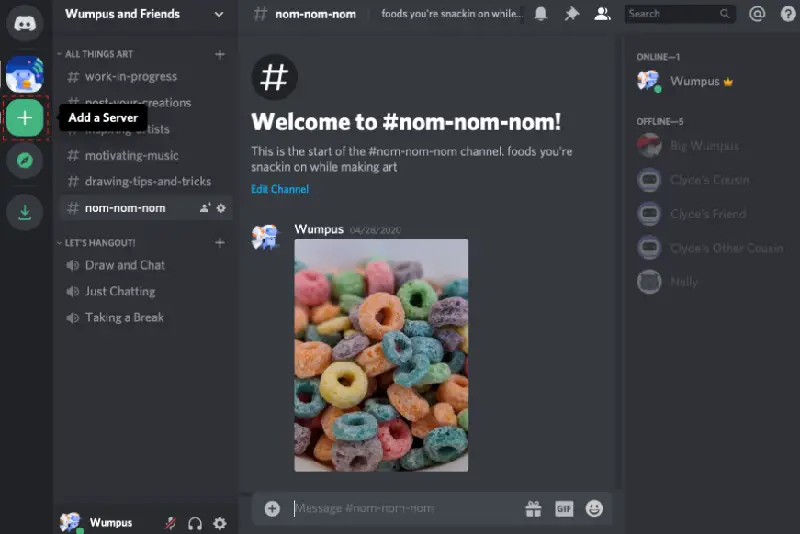
Then follow these steps:
- When you first open Discord and sign in, you’ll be given the option to either create or join a server. If you already use Discord and didn’t check this initial screen, go to the main menu and click on the large plus button.
- You’ll see the same screen either way. Next, click the “Create a Server” button.
- Choose a server name and check your region. Next, click the “Create” button.
You’ve just set up your new server, and you’re linked to it immediately. Select your new server from the left-hand menu, then click the drop-down arrow next to its name to see options for inviting friends, creating channels, and more.
How to make a role menu on Discord?
Roles in Discord are used to grant permissions. For example, you could establish a role for moderators and give it the power to ban people and remove messages. Any individuals you put under that role would keep the same capabilities. Roles help you avoid having to individualize privileges for each user. You might also utilize roles to provide your friends with attractive ranks and colors.
To manage roles, go to the server settings and select “Roles” from the left-hand menu. You may create new roles by clicking the little plus sign next to the “Roles” title on the page. Choose a role to administer permissions. There are a lot of permissions available, but the most important ones involve controlling the server by adding new channels or roles, managing users by banning or deleting messages, and moving people in and out of voice chat. There’s also an Administrator role, which allows you to do anything except those with server-specific permissions (such as deleting the server).
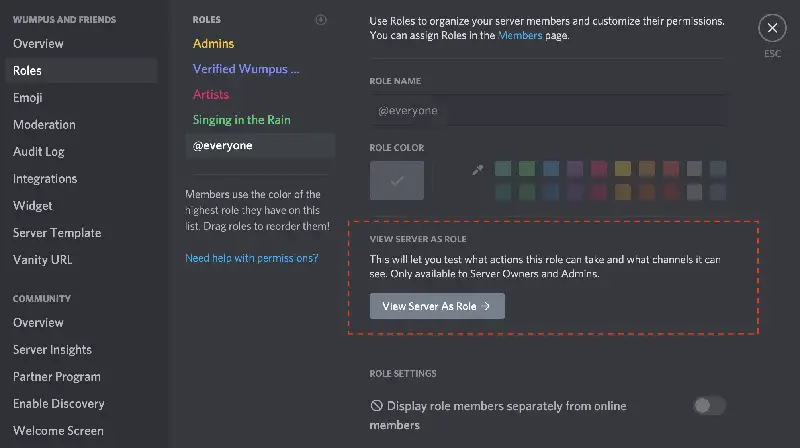
The first option, “Display role members separately,” will make people in that role appear in their own category in the Users panel. You may accomplish some interesting things by leaving this option off for certain roles. If you have a lot of admins but want to be identified differently, create a new position and place it above admin, but leave the option turned off so that it does not create a new category.
- Now you can create a role, and choose a color from the palette.
- Any user assigned to that role will be shown with the color you’ve chosen.
- This approach works with roles and permissions as well. You might, for example, create a “Server Administrator” role with the admin permission and distribute it selectively rather than giving it to everyone.
- You may add users to roles by right-clicking their name and checking the appropriate box on the “Roles” menu after you’ve finished setting up the roles you wish to use.
If you have a server with a lot of members, you may search for individuals in the “Members” option in the settings panel to avoid scrolling down and @ing them.
How to manage your Discord channel?
You can group channels on your server with categories. Select the “Create Channel” or “Create Category” option from the right-click menu anywhere on the channel page to establish a new channel or category.
Give your channel a name, and select whether it should be a text or a voice channel. Channel names must not include spaces or capital letters.
To name a new category, simply type the name you want it to have. Spaces are allowed in category names, and while uppercase and lowercase letters may be used, they display in all caps regardless.
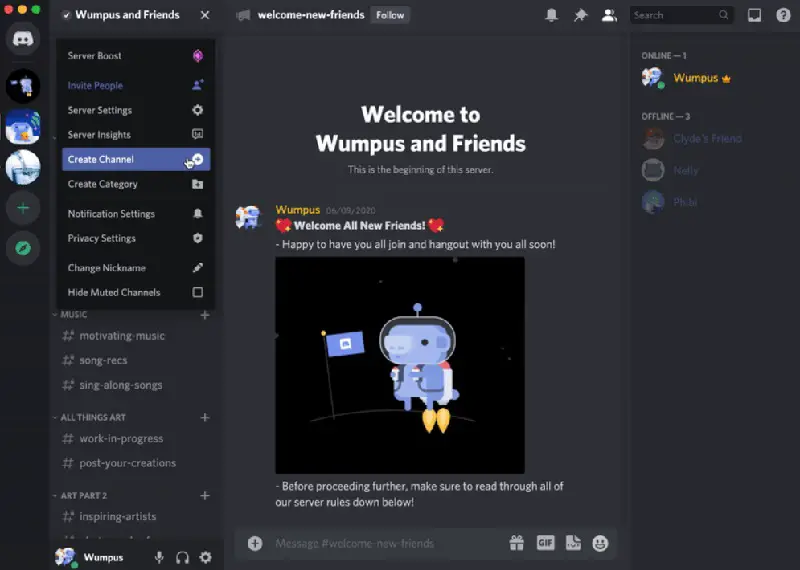
Channels have their own permissions that you can access by clicking the gear next to a channel. These defaults are set to sync with the category to which the channel belongs, but you may modify them if required.
You may also restrict channels and categories to only certain people. Simply pick “Private Channel” when generating a channel, then enable the permissions you want to give the channel.
If you only want to add a few people to the channel, it’s preferable to create a new role for that channel and then add users to that position.
How to design your Discord server?
When managing roles and channels on large Discord servers, you must take certain measures. For instance, if you’ve established a private channel and a new position for it, but that role is lower than another role with “Manage Roles” enabled, users in that role may grant themselves access to the new private role and your channel. So it’s best to take measures like these:
- Channel roles should be above the highest administrative role in order to ensure that they are properly empowered.
- The administrator role can be assigned any color they choose. However, if the admin role is set to a specific color and this color is placed above admin, it may give those admins the power to create new administrators.
- “Manage Channels” also lets users delete channels. As a result, you should probably avoid distributing this permission too widely. The same may be said for Administrator permissions.
- Members can still add reactions with emoji in read-only groups. People may use the full alphabet of emojis to spell out their thoughts in reaction to your messages because there are so many of them. These cannot be removed, so if you have a problem with people spelling out things they shouldn’t, you can turn it off at @everyone in the channel-specific settings.
- The “Audit Log” in the server settings keeps track of all administrative activities, such as removing messages or banning users. This allows you to identify and ban those who are causing issues.
- If you want to increase the auto-mod level for outside spam, go to “Moderation” in the settings and change it. This requires new users to verify their email or be current Discord users before joining.
How to leave a Discord server?
You can upload your own Emojis, create automated messages with the Webhooks section, or create a Widget to insert server information into a website. You will also be able to manage users, invitations, and banned lists, and even delete the server completely. So, at this point, all you have to do is spend some time shaping your server to suit your needs.

