In this article we will tell you how to add line numbers in Word. The functions that a program of the power and scope of Microsoft Word presents us with are more than we might think. These Word functions and tricks help us to create text-centered documents in the best way, as well as to improve their appearance or usefulness.
An example of this is the case we are going to talk about next, specifically the possibility of adding line numbers to a document. This is something that in Microsoft Word can help us to indicate the exact positions within the document, very useful in documents of many pages. Therefore, below we will show you how to add line numbers quickly and easily from this word processor.
How to add line numbers in Word?
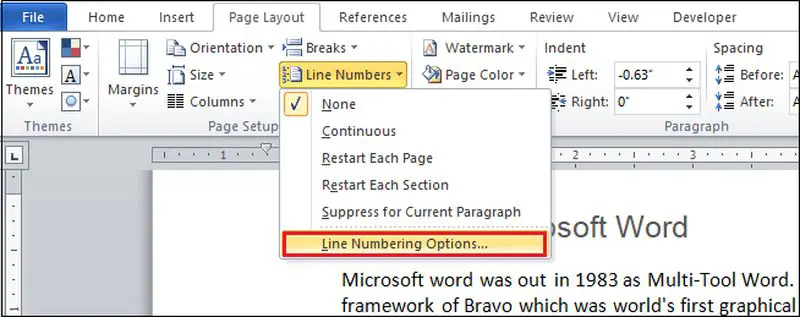
Before we start, we must take into account that Word treats tables and text boxes as if they were on a single line, regardless of their size. Therefore, once we know this, to start adding line numbers the first thing to do is to open the document conventionally. Once on screen, in the menu of the application, we have to go to the option called Format. Here we can already see, on the left side, a button called Line Numbers.
In the drop-down menu, we will see several options that allow us to make the line numbers repeat continuously, to restart each page or section, etc. Therefore one of the most interesting options is Continuous. Once activated in this way, the line numbers will appear on the left side of the document page. Also, these numbers will only appear in the preview mode, so if we have selected another view mode, they will not appear.
It may also be the case that we want to customize the appearance of these added numbers with our formatting. By default, they will appear with the same font, size, and color as the default style. Therefore to modify their appearance we will have to change this style, although Word hides it by default.
Add personal formatting to the new line numbers
First, we go to the Home tab and click on the small button in the bottom right corner of the Styles section to see the pop-up menu. Here we click on the Options button where under Select styles to display, we choose All styles.
After closing this window, we will have the opportunity to select and edit the font style called Line Number. We will then be able to apply the font, color, or size of the line numbers added earlier. In the drop-down list that appears when we select this, we click on the Modify button to choose the parameters mentioned above.

Of course, in case you want to remove these line numbers added to the Word document, it is easy to do so. We go back to the menu we mentioned earlier under Format / Line Numbers, but in this case, we choose the option None. The text document will then return to its original state, without the numbering mentioned here.


