In the latest update, Apple introduced a groundbreaking feature that for many users, begs the question of how to use Personal Voice iOS 17. This innovative tool, when coupled with Live Speech, empowers users to effortlessly communicate by converting text and phrases into a voice that’s uniquely theirs.
Let’s dive into how to set it up and our firsthand experience.

How to use Personal Voice iOS 17?
Within a mere 15 minutes of dictation, your iPhone crafts a digital replica of your voice, all processed locally and safeguarded through encryption. It’s not about replacing Siri’s voice with your own, but about granting those who struggle with speech a chance to reconnect with their own voice and communicate more effectively.
How to set up Personal Voice?
You can follow the 4 simple steps below to set up Personal Voice iOS 17.
- Open the Settings app on your iOS 17 device.
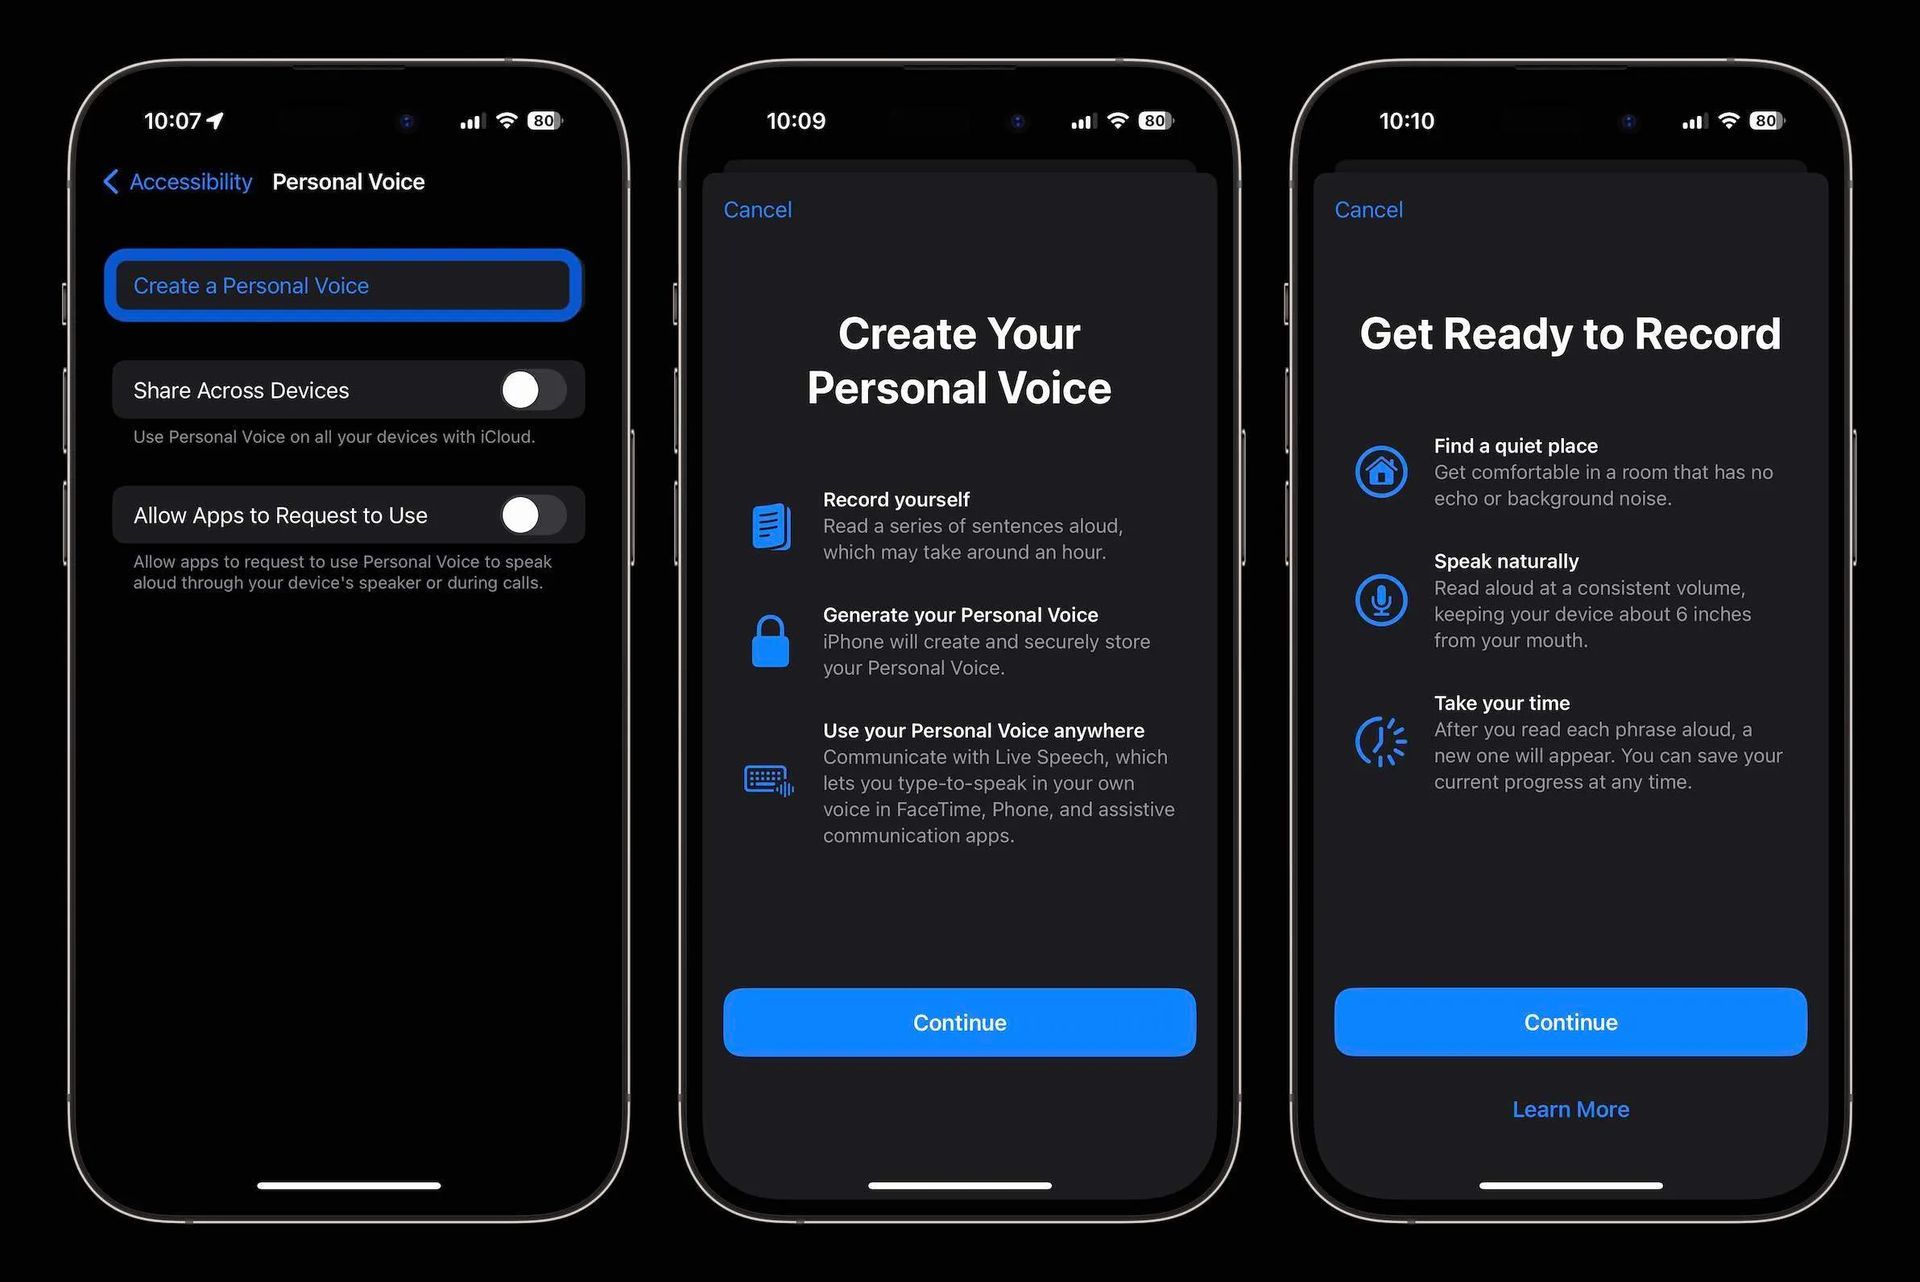
- Head to Accessibility > Personal Voice > Create a Personal Voice.
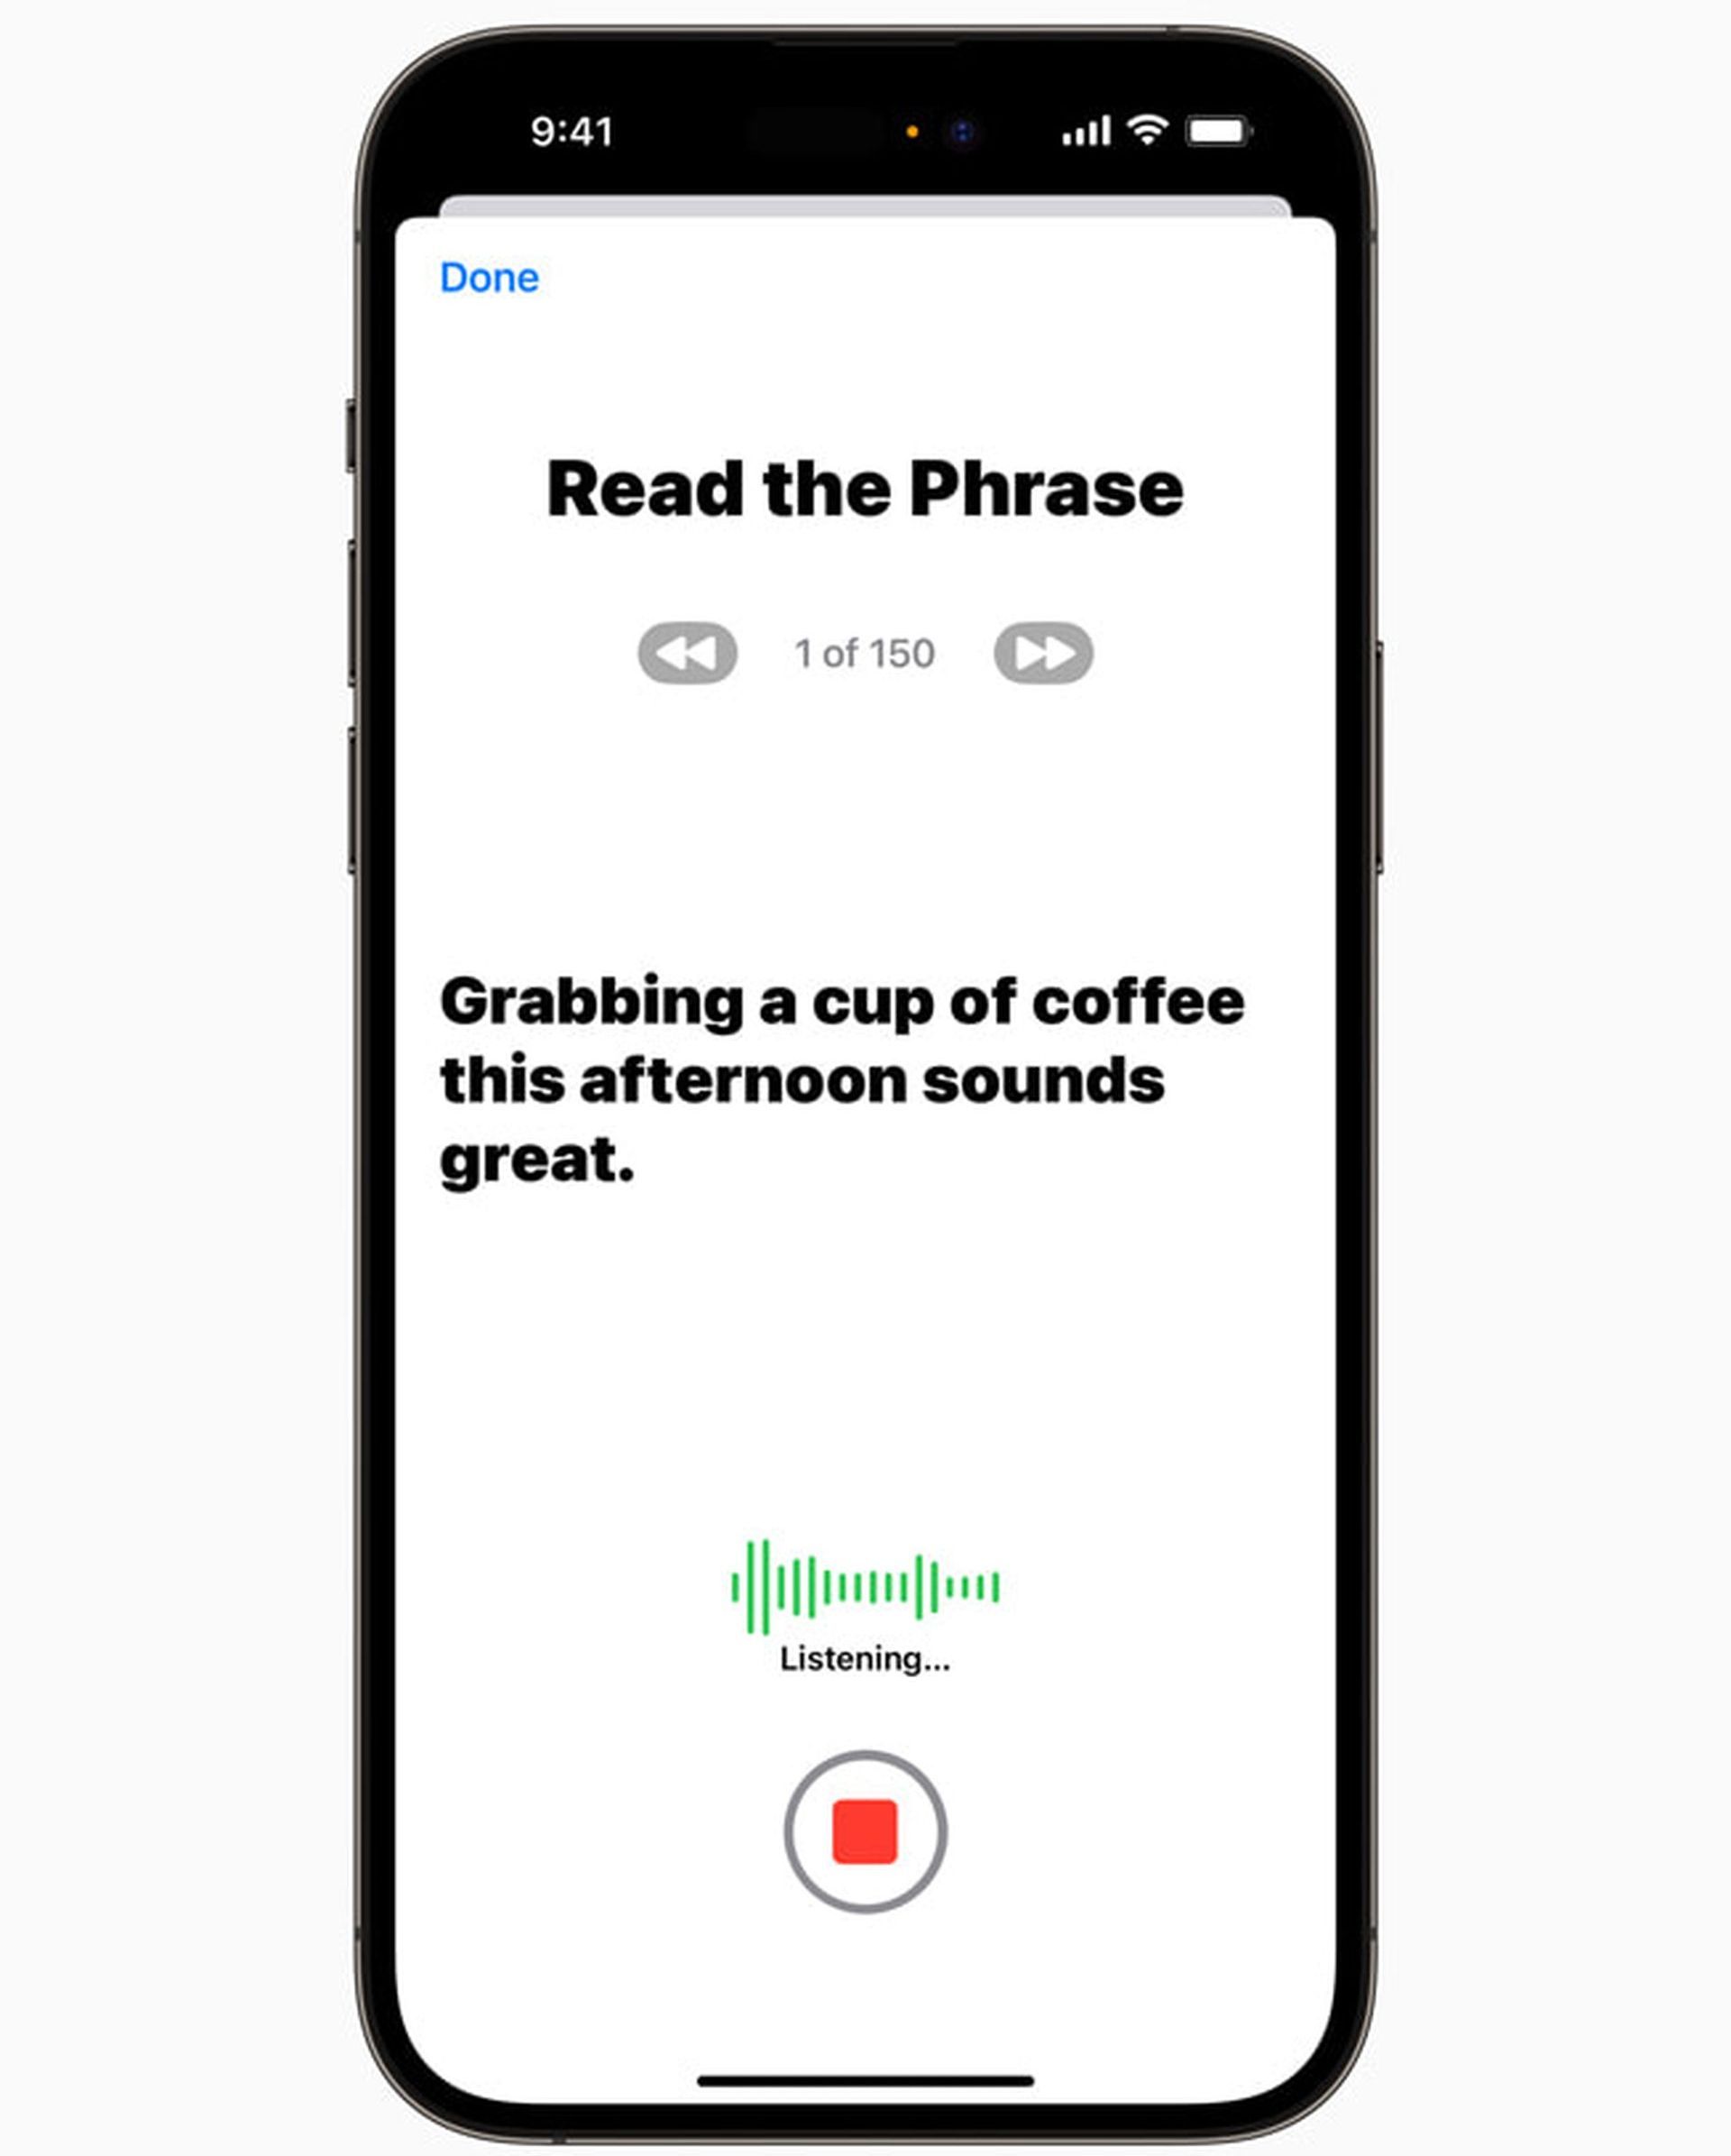
- Record 150 phrases with the iPhone directly in front of your face in a quiet room.
- Lock your phone and leave it on a charger to let your voice materialize.
Apple notes that this process may take overnight, but in our case, it took three nights for the voice to fully process. Given that it’s still in the beta phase, we anticipate swifter processing times in the future.
You can track the progress by navigating back to Accessibility > Personal Voice, though do note that this will momentarily halt the creation process.
How to use Personal Voice iOS 17 once you set it up?
Once your voice is ready, here’s how to make the most of it:
- Settings > Accessibility > Live Speech.
- Toggle on Live Speech.
- Tap Voices and select your freshly created Personal Voice (which will appear at the top of the list).
If your voice doesn’t show up immediately, don’t fret. Give it some time or try restarting your iPhone. In our case, a quick reboot and force quit of the Settings app did the trick.
With Live Speech activated and your voice selected, a triple-tap of the sleep/wake button opens the Live Speech text-to-speech tool. From there, you can type in the box or choose from your list of favorite phrases.
It’s a novel experience
It’s important to note that while it captured our tone, it lacked the cadence and inflection of our actual voice. It’s unlikely anyone would mistake your iOS Personal Voice for the real deal. Still, there’s something undeniably cool about hearing a version of your own voice read aloud. We’d recommend everyone give this a shot – you never know when this technology might come in handy.
If you’re using a different model of iPhone or other Apple devices, you can check out how to set it up in more detail right below.
How to use Personal Voice iOS 17 on other devices?
With Personal Voice, you have the ability to generate a synthesized voice that mirrors your own for seamless communication with loved ones. Whether in FaceTime calls, phone conversations, or assistive communication apps, your Personal Voice is your key to clear and personalized interactions.
Here’s what you’ll need:
- iOS 17, iPadOS 17, or macOS Sonoma, or later.
- One of the following devices:
- iPhone 12 or newer.
- iPad Air (5th generation) or later.
- iPad Pro 11-inch (3rd generation) or later.
- iPad Pro 12.9-inch (5th generation) or later.
- Mac with Apple silicon.
- Face ID, Touch ID, or a device passcode/password.
Creating your Personal Voice
- On your iPhone or iPad:
- Open the Settings app.
- Tap Accessibility, then tap Personal Voice.
- Tap Create a Personal Voice.
- Follow the onscreen instructions to record your voice.
To pause your recording session, simply tap Done or close the Settings app. Your progress will be saved.
- To resume a recording session:
- Go to Settings > Accessibility > Personal Voice.
- Tap the Personal Voice you wish to continue creating.
- Tap Continue Recording, then follow the onscreen prompts.
- On your Mac:
- Choose Apple menu > System Settings, click Accessibility in the sidebar, then click Personal Voice.
- Click Create a Personal Voice.
- Follow the onscreen instructions to record your voice.
To pause your recording session, click Done. Your progress will be saved.
- To resume a recording session:
- Choose Apple menu > System Settings, click Accessibility in the sidebar, then click Personal Voice.
- Click the Show Detail button next to the Personal Voice you wish to continue creating.
- Tap Continue Recording, then follow the onscreen prompts.
Deleting a Personal Voice
Once you delete a Personal Voice, it cannot be recovered.
On your iPhone or iPad:
- Open the Settings app.
- Tap Accessibility, then tap Personal Voice.
- Select the Personal Voice you wish to delete.
- Authenticate with Face ID or Touch ID, or enter your passcode.
- Tap Delete Voice, then tap Delete Voice And Recordings to confirm.
On your Mac:
- Choose Apple menu > System Settings, click Accessibility in the sidebar, then click Personal Voice.
- Click the Show Detail button next to the Personal Voice you wish to delete.
- Enter your password.
- Click Delete Voice, then click Delete Voice And Recordings to confirm.
Syncing your Personal Voice across devices
You can synchronize your Personal Voice across devices signed in to iCloud with your Apple ID.
On your iPhone or iPad:
- Open the Settings app.
- Tap Accessibility, then tap Personal Voice.
- Turn on Share Across Devices.
On your Mac:
- Choose Apple menu > System Settings, click Accessibility in the sidebar, then click Personal Voice.
- Turn on “Share across devices”.
Privacy assurance of Personal Voice
Rest easy knowing that Personal Voice is engineered with your privacy and security in mind. It’s encrypted and stored securely on your device, ensuring only you can access it via Face ID, Touch ID, or your device passcode/password. When you share it across devices, iCloud deploys end-to-end encryption to safeguard your Personal Voice.
Moreover, Personal Voice can only be utilized with Live Speech and third-party apps you authorize, such as augmentative and alternative communication (AAC) apps. You have full control over app access to Personal Voice in Settings. Additionally, the third-party apps you grant access to cannot record speech from Personal Voice.
Remember, knowing how to use Personal Voice iOS 17 is exclusively for creating a voice that’s uniquely yours on your own device, for personal and non-commercial use. Your Legacy Contact won’t have access to your Personal Voice.
Let us also note that Personal Voice is set to be a prominent feature in iOS 17, expected to roll out later this fall alongside Apple’s other flagship operating systems.
Featured image credit: Apple

