One of the most useful things about being able to remove audio from a file is that it can reduce the costs of doing so. Most transcription services will charge you for each audio minute, but they will not differentiate between the files you need and those you don’t.
So, one of the most important steps in the editing process is to use an audio trimmer to remove some of the audio from the start or the beginning of a file. Doing so can be incredibly frustrating when you have multiple audio files to export.
Fortunately, there is a new online tool that will help you do this, and it will make your workflow easier. This guide will teach you how to use it.
Beginners guide on trimming audio files
One of the most important steps in enhancing the listening experience is to remove redundant sounds from the audio file. Doing so will allow you to share the audio with others.
It will also help reduce the amount of dead silence you can hear in a speech.
This is why having a clean and engaging audio file is very important for an interview or speech.
Choosing your audio trimmer software
The rise of online media-sharing platforms has resulted in a huge number of software for editing audio. Unfortunately, many of these programs are incredibly complex and can lead to a steep learning curve. But you can easily cut an audio with the beginner-friendly audio trimmer online.
Moreover, the mp3 audio trimmer is very simple to use and features a clean design that makes it easy to use. In addition, its web-based platform also eliminates the need for you to install software on your device. Just upload your files, and it will be good to go.
Furthermore, this feature allows you to operate on multiple devices at the same time. You can easily cut speeches or interviews using this audio cutter, which supports various file formats.
Trim audio using an audio trimmer in easy steps
Trim your audio files now using an online audio trimmer, and remember to follow the steps below. It is super easy, and you do not need any special knowledge to do it.
You can upload a wide variety of audio files without the need to convert them first, and it is completely safe and secure.
Step 1: Go To Your Audio Trimmer Software
To start using your chosen audio cutter and trimmer software, go to the program’s website and scroll down to the bottom.
You will be taken to the section labeled “Audio Trimmer & Cutter.” To find it, go to the section labeled “Transcription.”
Step 2: Upload Your Audio File
To upload your audio file, go to the upload button, select the file you want to be trimmed, and click OK.
Step 3: Trim Your File
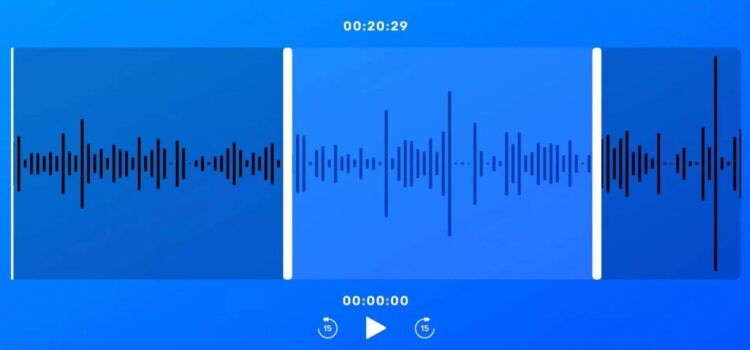
Trim the audio file by dragging the vertical white bars in either direction. You can select the amount of audio you want to exclude from either end of the bar, which will determine which bar you move.
Moreover, any audio that has been highlighted will have a lighter blue tone, and pressing the play button will let you know what exactly you highlighted.
You can also skip through the file in 15-second intervals.
Step 4: Save The Audio File To Your Device After Trimming
After you are happy with your edit, click the download button, and it will allow you to save it to your device.
You can also choose to remove the file by pressing the trash can and selecting “remove.” This will allow you to start the process over again using the new audio file.
What’s an audio trimmer MP3?
Audio trimmer mp3 software is designed for audio production are those that are focused on providing the best possible audio editing experience.
While plenty of digital audio workstations can do audio editing, we have compiled the simple steps designed to work seamlessly with music production.
On the other hand, all of the audio trimmer software have full control over audio manipulation, and these include:
- Select audio from a microphone
- Copy and paste
- Remove audio from the timeline
- Trim or merge two files
These types of simple waveform edits can be destructive, as they often change the original when you click “Save.”
Conclusion
Although using a browser to edit and trim audio is easy, it is not for everyone. In addition to being laggy, web apps can crash, and your connection speed can affect how productive you are.
With that in mind, consider using a cloud-based tool. Its free plan only supports five-minute mono recordings and 16-bit audio at 48 kHz and has an hour of storage. Its premium plans allow you to record stereo.


