Today we are going to show you how to use MSI Afterburner. For many users, the notion of overclocking their GPU is frightening. However, it does not have to be that way. You may improve performance without harming your hardware as long as you know how to do it and where to stop.
MSI Afterburner is one of the greatest GPU overclocking utilities available, with a slew of features for all sorts of GPU tweaking, including over and underclocking. Still, it’s difficult to get into at first, especially if you’re a novice in the overclocking world. Now let’s learn what is MSI Afterburner, and how to use it?
What is MSI Afterburner?
MSI Afterburner software is, without a doubt, one of the most frequently used GPU overclocking tools available for Windows. MSI Afterburner is a graphics card overclocking utility developed by Micro-Star International (MSI), a Taiwanese technology firm specializing in computer hardware.
It’s MSI, a PC gaming equipment manufacturer, as well as a graphics card and motherboard maker. Is MSI Afterburner only compatible with MSI-made graphics cards? The answer is no.
MSI Afterburner allows you to change almost every aspect of a GPU, from clock speeds to core voltage, power limit, and temperature limitation. Other program don’t give you all the tools you need to adjust your GPU to your exact needs.
MSI’s overclocking software is unique because it works on any graphics card, regardless of manufacturer or type, and includes functionality for cards not made by MSI. Furthermore, it’s completely free and provides a lot of extra features in addition to being an overclocker.
MSI Afterburner is based on RivaTuner, a very old overclocking program that was first released in 1997. It was last updated in 2009, but it has been around since 1997. RivaTuner serves as the basis for a number of overclocking utilities, including EVGA Precision X and ASUS GPU Tweak, among others.
How to install MSI Afterburner?
The latest version of MSI Afterburner is available from MSI’s website. There are no special versions to search for; simply download the installer and get started.
Install the software. It will ask if you wish to install MSI Afterburner or RTSS, which is included with the package. RTSS isn’t essential for the program’s operation, but it does provide overlaid statistic and frame rate information during games, which is a really cool feature. That’s entirely up to you.
Simply follow the on-screen instructions to install MSI Afterburner. Once you’ve made your selections, run the installer, go through the rest of the steps, and wait until it’s done. Congratulations! You’ve now installed MSI Afterburner on your computer.
How to use MSI Afterburner?
MSI Afterburner is a powerful software that can perform many tasks. Here are some examples of what you may accomplish with it, and how to go about doing so.
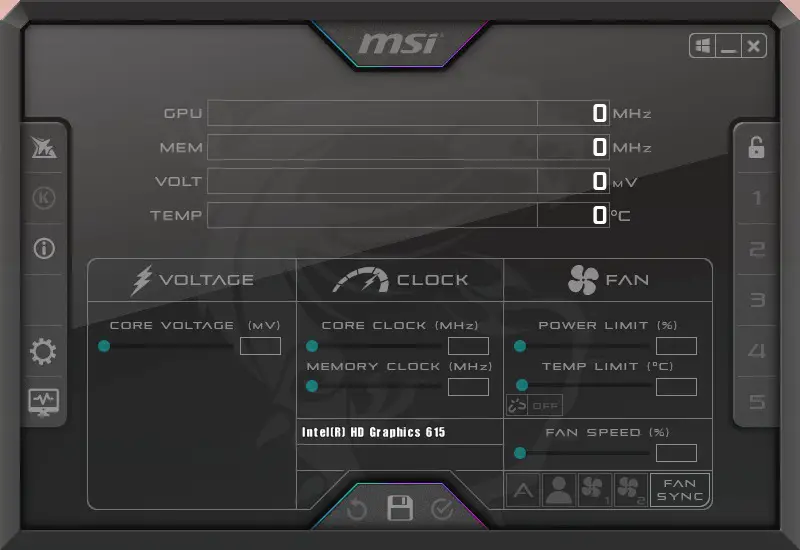
When you initially launch the app, you’ll see a UI that looks like a car dashboard. There’s a strong thematic element on top of it, which reminds us of the sorts of themes Windows Media Player from the late 1990s had.
Finally, on the bottom, you’ll notice statistics about your GPU. The clock speed it’s currently operating at and the temperature it’s running at are both shown here. The bottom section includes several sliders that we’ll go into further detail about in a bit, but essentially, they’re what allow you to overclock and underclock your GPU and do other things to it.
MSI Afterburner uses OC Scanner, a program created by Nvidia that applies an algorithm to identify any GPU model (whether it’s a 960 or 2080), to work with every graphics card available. After the OC Scanner has identified your card, it will use the highest and most stable overclocking settings for that specific card. Then, it makes the adjustments to your device right away in order to get improved performance.
On the left, there are numerous buttons to choose from. The Afterburner website will be opened with the spaceship logo, and the “K” logo will bring up MSI Kombustor. The information button will display information about your CPU and GPU. The OC Scanner tool is intended to scan your GPU automatically and look for the highest possible overclock, after which it will apply that to your GPU. Then there’s the settings button and the “monitor” button, which will display a graph of your graphics card’s temperatures on screen.
Benchmarking is a popular technique among product testers and fans alike today, especially given the competitive environment surrounding the GPU sector. People want to know which card is superior, therefore a level playing field like benchmarking tests are ideal for demonstrating that.
The latest version of MSI Afterburner, which we’re testing here, has a benchmarking tool called MSI Kombustor that puts your graphics card to the test by executing a variety of stressful GPU operations. It’s an excellent approach to see whether or not your overclock modifications have improved your GPU performance. We’ll get into how to use the program in more detail later on.
There are hundreds of video recording techniques available, and Afterburner has its own custom capture software. Predator is a program that captures in-game footage, instructions, benchmark results, and other things. You can record in a variety of formats, resolutions, and frame rates.
On the right side, you’ll see a variety of digits. “Profiles” are what they’re called. In layman’s terms, whatever changes you make to your GPU, you may save them as a profile and use it at any time by clicking it.
You may also modify the default layout if it isn’t sufficient for you. Simply go to Settings, User Interface, and pick one of the many pre-installed themes.
How to overclock your GPU with MSI Afterburner?
There are two ways to overclock your GPU using MSI Afterburner. The first is to utilize the OC Scanner function. This is a tool that will automatically look for the best overclocking settings on your GPU.
To begin, open the OC Scanner app and select the OC Scaner button. Tap the scan button after that. It will take several minutes to complete, so sit down with a cup of coffee while you wait for it to finish. After it’s finished, it’ll apply the settings that it believes are ideal for your GPU.
You may also manually adjust the sliders to overclock your GPU. To allow for headroom when overclocking, move the Power Limit/Temperature sliders up (both sliders are pinned to each other by default, so moving one up will change both).
Then, increase the Core Clock (MHz) slider. The Memory Clock may also be adjusted. It’s a good idea to make minor adjustments manually and play around to find a suitable balance between system stability and performance—but don’t harm your hardware while doing so.
How to yse MSI Kombuster?
The following brief tutorial will show you how to use MSI Kombustor:
Open MSI Afterburner. You should see three buttons in the upper-right corner of the program. The letter “K” is one of them. Kombustor is designated by the “K.” If it isn’t illuminated and can’t be clicked, go to the MSI Afterburner website and download the Kombustor app.
To enable these features, simply click the “K” button, which should be above the ‘core voltage’ meter. MSI Kombustor should load right away and begin stressing your GPU. You may now keep track of your GPU’s temperature, frame rate, GPU loading, and more. This will show you how well your graphics card performs at default settings. Once the test is finished or before you shut it off, save your results so you can compare them to the performance-enhanced, overclocked settings.
At this point, you’ll want to begin your overclocking procedure. We recommend searching online for other users’ overclocking results with the same card as yours to ensure that you are pushing it as far as it will go.
How to enable on-screen display?
Click on the settings tab and select the monitoring option from the drop-down menu. Check the “show in on-screen display” box under “Active hardware monitoring graphs” to choose which metrics you’d want to show on your screen. You can show the FPS, core clock speed, memory clock speed, and temperatures if you’re doing a benchmark, for example. The OSD (On-screen display) will always show real-time information regarding your GPU’s performance whenever you start a game. You may use in-game hotkeys to turn on and off the OSD, which is handy for regular usage.
How to modify your fan curve?
You may also adjust your fan curve using the software. You may change how fast your fan will go and when it will cease. To do so, go to Settings and select the Fan tab. Then, switch on Enable user-defined software automated fan control. The graph showing your fan curve should display now.
You may include up to eight nodes in the fan curve and customize it as you see fit. A higher fan curve will keep GPU temperatures lower, but it can also put more wear and tear on the fans, so if you want to change it manually, you’ll need to discover a balance that works for both of them.
How to limit your GPU by power consumption/temperature?
Overclocking with Power Limit/Temperature sliders was previously discussed. But it may also be utilized to maintain power usage or temperatures at a low level without sacrificing much performance.
To avoid a situation like this, instead of moving the sliders up, move them down. For example, if you don’t want your graphics card to go to 100% every time you turn on your PC, you might set the Power Limit slider to 75%.
Does MSI Afterburner improve FPS?
Yes, MSI Afterburner will almost certainly raise your overall FPS. In fact, it may assist you in two distinct ways to increase your frames per second. First, MSI Afterburner offers its own overclocking tool that can be used to automatically push your GPU and even part of your CPU to their limits without the danger associated with manual overclocking.It’s a very useful feature that may be compared to Intel’s TurboBoost CPU technology in terms of how it improves performance. It pushes your hardware as far as possible without causing any problems, and it’s ideal for novices who are interested in overclocking their PCs.
Does MSI Afterburner damage GPU?
The MSI Afterburner program uses something called OC scanning to determine the specific GPU in your system, so it knows what it’s dealing with. As a result of this, the software’s automated OC settings should never harm your GPU. It will simply avoid suggesting any voltage or temperature modifications that would cause damage.
However, overclocking is inherently dangerous and will always have an impact on device lifespan, so depending on your goals, it may not be the greatest idea to leave this auto OC at 24.7. It’s possible that manually overclocking with MSI Afterburner irresponsibly might take some of your graphics card’s life away.
Conclusion
As an experimental technique, pushing things too far is a large component of overclocking, so MSI Afterburner does not place a limit on OC settings.
MSI Afterburner is a fantastic piece of software that we believe every PC gamer should have on their computer. It’s lightweight, and it allows you to not only overclock but also fine-tune your GPU so it runs exactly the way you want it to. This way you’ve learned how to use MSI Afterburner. You can also learn how powerful Intel Arc GPU could potentially be, by visiting our article. By the way Asus announced its GPU Tweak III tool for GPU monitoring and overclocking.


