You can learn how to test surround sound Windows 10 with this article. With so many speakers, setting up and test surround sound speakers might be tough. Windows 10 includes a handy built-in test application that can assist you in setting it up. Here’s how to use it.
How to test surround sound Windows 10?
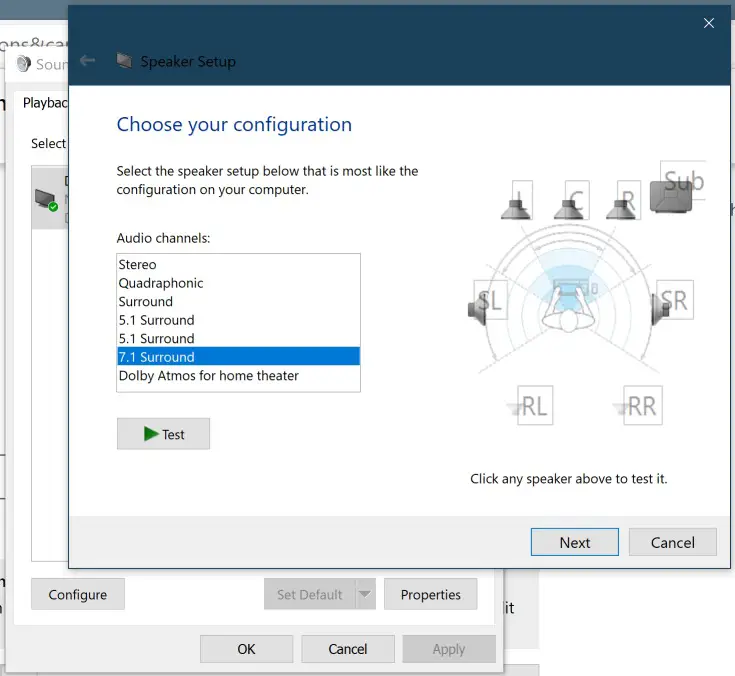
To begin, go to the taskbar and right-click the speaker symbol. Select “Sounds” from the menu that appears. To test the surround sound output device you’ve chosen, go to the Playback tab and select it from the list. This most likely is named named “Speakers” on many PCs. To configure your selected gadget, click the “Configure” button.
The “Speaker Configuration” window will appear. Choose the configuration you’d like to test from the list of audio channels. If you have 7.1 surround sound connected and want to see if it works, choose “7.1 Surround.”

Then, below the channels list, click the “Test” button. All of the speakers in the configuration will play a test chime one at a time, with each speaker being highlighted in the diagram as it does so. To end the test, click the “Test” button again, which will show “Stop” while the chimes play.
Click on a speaker in the diagram on the right side of the window to test individual speakers. A chime will sound when you click a speaker. This might assist you in determining whether your speakers are positioned correctly.
When you’ve completed the installation of your sound equipment, feel free to hit “Cancel” or close the window with the “X” button in the corner after that. After that, go to “Sound” and choose “OK.” If necessary, you may also click “Next” and go through the wizard to tell Windows which speakers are connected and which are not.
The best Windows 11 keyboard shortcuts
We hope that you found our guide on how to test surround sound speakers useful and will never again have any issues while setting up your brand new speaker system.


