If you don’t know how to fix the Discord update failed issue, don’t worry because we are going to explain everything using simple, straightforward approaches.
Discord is a popular software for chatting and entertainment. Many people, however, have encountered the Discord Update Failed problem, which prevents the program from launching. In most situations, Discord gets stuck in an update loop and refuses to allow users to use the software.
Discord update failed fix
We are going to explain five different steps in order to fix the Discord Update Failed error.
Step 1: Run Discord as administrator
The Discord Update Failed problem can be resolved by simply running the program with administrative permissions. The updater is able to modify your device’s settings, allowing you to download and install the new Discord update.
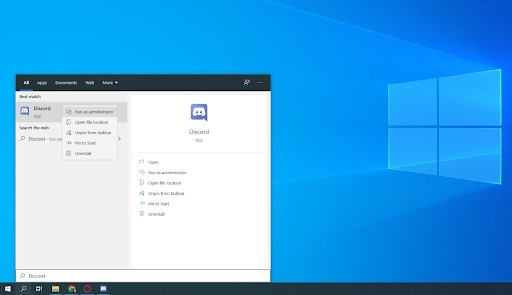
Please keep in mind that this requires you to have local administrator authority. Otherwise, you’ll need access to an administrator’s password.
- Press the Windows button and type in “Discord”.
- Right-click on the Discord application in the results and select Run as administrator from the drop-down menu that appears.
- If you’re asked if you want to allow Discord to run and make changes on your computer, click Yes. This is necessary in order to update the software.
Step 2: Rename the Update.exe file
The Discord update.exe file might be the source of the error. We recommend that you try to rename this file in an attempt to successfully upgrade Discord to the most recent version.
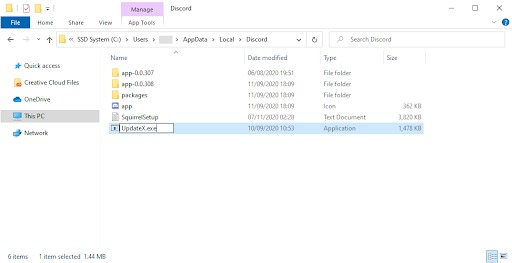
- Go to your AppData folder:
- Press the Windows + R keys and go to this directory: “C:\Users\Username\AppData”. Make sure to remove the quotation marks and replace “Username” with your own local account username.
- Enter the folder called “Local”
- Find the folder named “Discord” and open it.
- Find the Update.exe, right-click on it and choose “Rename.”
- Rename it as “UpdateX.exe”.
- You may restart Discord and test it as an administrator, as instructed above.
Step 3: Disable Windows Defender
In some situations, Windows 10’s built-in antivirus software may conflict with the Discord Update, causing it to stall repeatedly. To try and update Discord manually, follow these instructions.
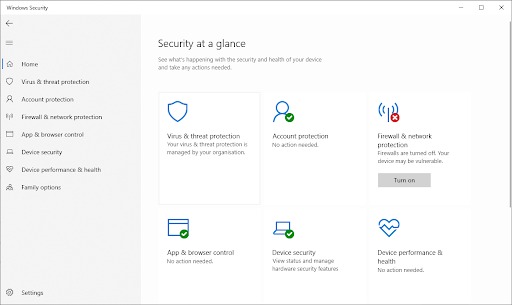
- To do so, open the Settings application by pressing the Windows+I keyboard shortcut or the gear button from your Start menu.
- Enter the Update & Security tab.
- Go to Windows Security, choose Virus & Threat protection, and finally enter Manage Settings.
- Real-time protection should be switched off. Windows Defender will be effectively disabled until the option is toggled back on.
- You may restart Discord and test it as an administrator, as instructed above.
Step 4. Disable your antivirus software
Antivirus programs are known to cause problems on computers by disrupting your internet connection and blocking applications and services from operating correctly. You may try temporarily turning off the antivirus you’re using to see if it’s the source of the Discord Update Failed problem.
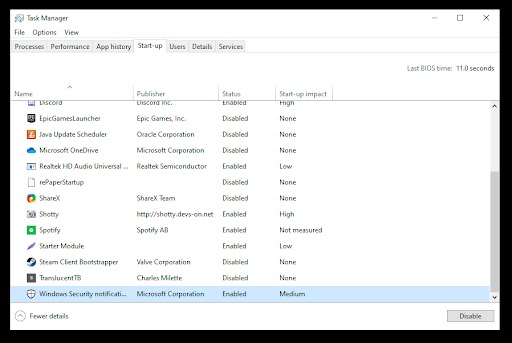
- Open the Task Manager.
- If the Task Manager is in compact mode, click on the “Mode details” button to expand details.
- Select the Start-up menu option in the header bar at the top of the window to display this menu.
- Click on the name of your antivirus software.
- Click the Disable button and when you start your device, this will prevent the application from launching.
- Restart your PC and open Discord to see if the problem resurfaces. If it is able to update correctly, it’s most likely that the source of the issue was your antivirus
Step 5. Reinstall Discord and clear app data
If you’ve exhausted all of the above options, your last resort should be to entirely remove Discord and reinstall it with the official installer. Follow these steps to do so.
To begin, you must uninstall Discord. Open the Settings program using the Windows + I keyboard shortcut or the gear icon from your Start menu.
- Enter the Apps tab.
- Navigate to the Applications list by clicking on the Discord icon. The program’s name may be found by clicking on Name, or you can use the built-in search to find it.
- Choose Discord and select Uninstall.
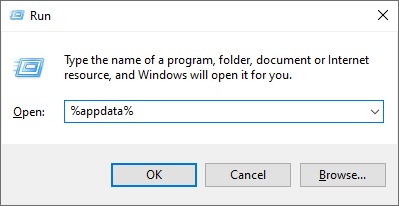
- Now we need to clear the app data, go to Start -> Open Run or press Windows + R on your keyboard. This will bring up the Run utility.
- Type in “%appdata%” and hit enter. This will take you right to the AppData folder in File Explorer without any further ado.
- Delete the Discord folder by right-clicking on it and then selecting Delete.
- Visit discord.com and download the most recent version of the program by clicking on the Download for Windows button.
This way you’ve learned how to fix Discord update failed on Windows, thanks for reading!

