We are going to explain why we see the error “Windows could not automatically detect the network proxy settings” that Windows may give you from time to time, what to do and how to fix it. This is one of the relatively common errors that you may encounter in this operating system, and that can prevent you from connecting correctly to the Internet.
In TechBriefly, we are trying to help you with some of the most common errors of this operating system and we are going to do the same with this error, explaining what it means and how to fix it if you ever encounter it.
What does “Windows was unable to automatically detect the network proxy settings”error mean?
A proxy is a device that acts as an intermediary between your computer when you connect to the Internet and the server you are going to connect to access a website, sending the server your access requests and covering your back a bit so that the server does not know that it is sending the packets to you specifically.
This way, when you go to visit a web page, instead of establishing a direct connection between your browser and it, you can take a detour and send and receive data through this proxy. The page you visit will not know your IP address but the one of the proxy, and you will be able to impersonate an Internet user from another country.
Setting up a proxy can help you improve your privacy or access content blocked in your country. Proxies have to be configured manually for these things, and if someone has been messing with these settings on your computer and something goes wrong, then you may get this error message.
It is also possible that the problem stems from an error in getting your IP when browsing or some other small problem in your network configuration. Therefore, there are several types of solutions available to you. Let’s try to walk you through some of them.
How to fix “Windows was unable to automatically detect the network proxy settings” error?
Turn off and on the PC and Router
Let’s start with the universal solution to any computer problem. The first thing to do is to see if the problem fixes itself, or if Windows can fix it automatically at startup. To do this, turn off both your PC and router, then turn it back on. Yes, the eternal power off and on a solution.
Use the troubleshooter
The first solution is the one you should always turn to before messing around, as Windows itself may be able to fix the problem automatically. To do this, we will go to the troubleshooter. It enters in the Configuration of Windows pulsating in the icon of cogwheel that you have in the menu of beginning or center of notifications, and once inside, pulsate in the section of Network and Internet.
Once you enter the Network and Internet settings, make sure that you have automatically gone to the Status section in the left column. Here, scroll down the menu a bit, and click on the Network troubleshooter option under *Advanced network settings.
Now, a troubleshooter window will open and you will simply need to follow the steps as prompted. You will have to specify your connection, which can be WiFi or Ethernet, and if you are not sure you can ask it to check everything with the *All network adapters option. Windows will try to automatically detect and fix the most common problems in case yours is one of them.
If Windows does not detect the problem and fails to fix it automatically, you may get another window asking you something more specific about what kind of problem you have, so it can refine its internal error search. Here, follow the steps and answer the questions to try to get everything fixed automatically.
Check your Proxy settings

The error is in the proxy, so the next step is to check what you have in this configuration if Windows does not fix it. To do this, go back to Windows Settings by clicking on the gear icon you have in the start menu or notification center, and once inside, click on the Network and Internet section.
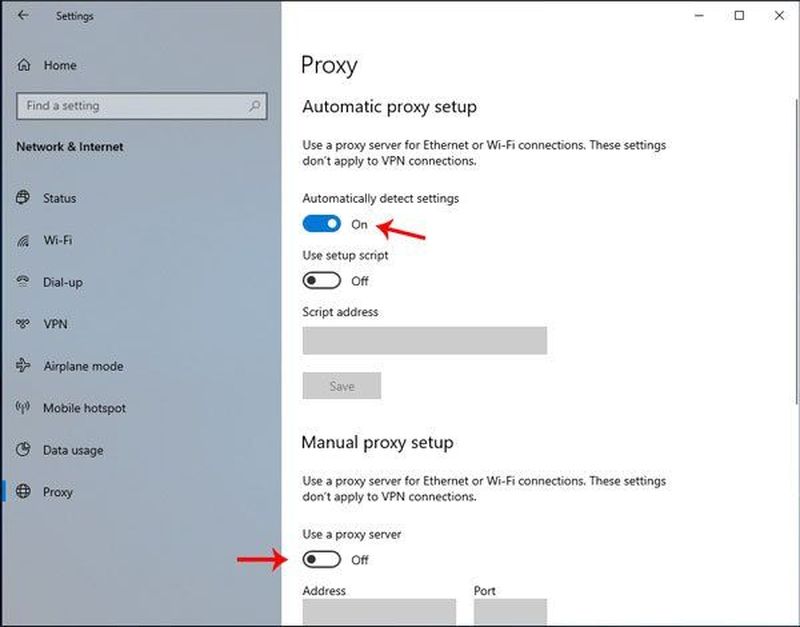
Once inside the Network and Internet settings, in the left column click on the Proxy section (1) that appears at the bottom. Once inside the Proxy settings, make sure to enable the Automatically detect settings option (2). If necessary, deactivate and reactivate the option.
It is also possible that the proxy you were running is giving an error. To do this, disable the configuration script you had, and then below in Manual proxy configuration, delete the data of the proxy you were using. Now, restart the computer and the router to see if the error is solved.
Check the IP configuration
As we said at the beginning, this may be a failure derived from the IP settings of your computer. To check if this is the case, go back to Windows Settings by clicking on the gear icon in the Start menu or Notification Center, and once inside, click on the Network and Internet section.
Once you are inside the Network and Internet options, in the left column go to the Ethernet or WiFi section depending on how you are connected. Inside, click on Change adapter options in the Related settings category.
This will open the old control panel from previous versions of Windows, directly under the Network Connections options. There, right-click on the connection you are using, and click on the Properties option in the pop-up window that will appear.
In the priorities window, click on the Internet Protocol version 4 option and then on the Properties button (1) that will appear just below it. This will open a new window, in which you must make sure that you have the Obtain address automatically (2) options selected. If you already had it this way, this is not the error, and if you had a specific IP, try restarting now.
Verify the network with inetcpl

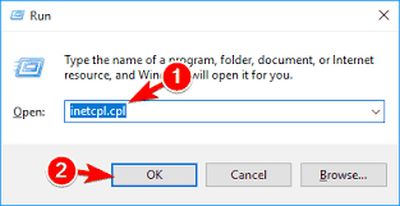
It may also be due to an error in the LAN configuration. To check this, press the Windows + R keys together to open the run window. Inside it, type inetcpl.CPL and click OK to open the Internet properties window.
Once the window opens, you must first click on the Connections tab at the top (1). Once inside, now click on the LAN Settings button (2) at the bottom of the window.
This will open a small window called Local Area Network (LAN) Settings. In it, be sure to check the Automatically detect settings option. If this is not already the case, after clicking OK, restart both the computer and the router.
Go to the command prompt
And as always, you can also go to the Windows command prompt, the Command Prompt, which you can open directly by searching for its name in the Start menu, making sure to start it as administrator. Once inside, you can try these commands to reset your IP by typing them in the order given.
- Type netsh Winsock reset and press Enter.
- Type netsh int IP reset and press Enter.
- Type ipconfig /release and press Enter.
- Type ipconfig /renew and press Enter.
- Type ipconfig /flushdns and press Enter.
- If it does not work, try the command netsh int IP reset resetlog.txt to reset it.
Use the internal tool
Type sfc /scannow and press Enter.
The check phase may take several minutes.


