Today we’ll tell you how to create a custom power plan in Windows 10 and what are the benefits. Customizing the Windows power plan settings can help to improve your computer’s performance, as long as you do it with caution. We explain how.
How to create a custom power plan in Windows 10?
Determine how long we want the screen to be on, how much performance power to allocate to the video player, or if the WiFi adapters are turned off or not. Windows 10 power plans offer all these options to play between energy-saving and more powerful performance.
Creating an equal and optimal balance between the two objectives is not always easy, when you tighten one nut may jump another. That is why it is important, adjust the Windows power plan carefully so as not to get the opposite effect to the one we want, but without giving up this tool to control a little more the experience that gives us the device at every moment.
Let’s see how we can create from scratch a custom power plan in the Windows computer settings. It is a very simple process that you can shape little by little with small adjustments until you find the balance that your work or entertainment activity requires.

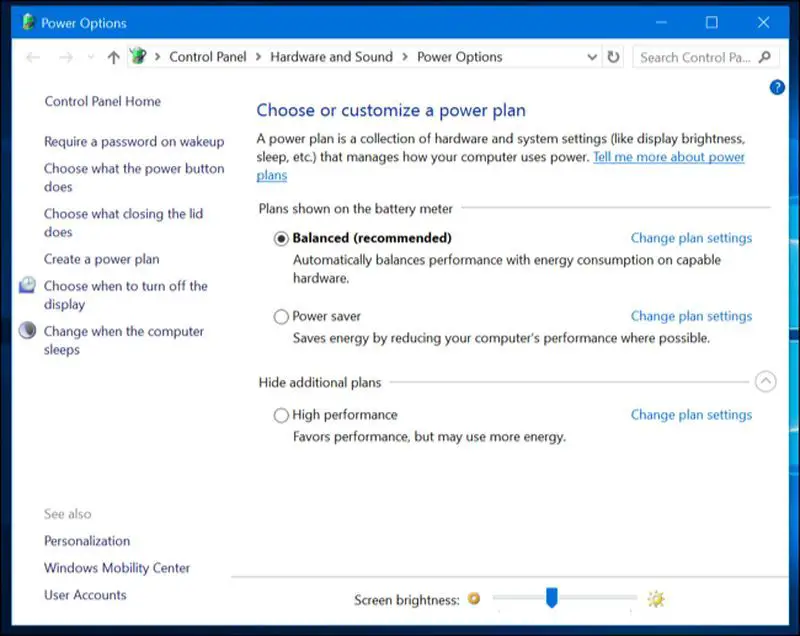
The first thing you must do is to open the Control Panel. Typing the name in the Windows search bar the program opens and you can enter the Hardware and Sound section. Inside you will find the Power Options section and the option Choose or customize a power plan.
We start from the Balanced plan that manages an optimal power saving as long as it is not necessary to boost the performance to the maximum. However, you can also choose between the High performance or the Energy saver plans that opt for a more powerful performance or prioritize battery conservation, respectively.
In the side menu, you will see the option Create a power plan, click and give it the name of your choice. Now click on the next button to modify the plan options to your liking. As what we are looking for is to maximize the performance we increase the time the device is active to 20 minutes when it depends on the battery. And we choose the option Never when connected to the charger. If what we want is that the battery lasts longer, the figure should go down instead of up.
Now that you have chosen your optimal and customized balance, click on create. You will see the customized plan appear in the list of available plans. Click again on Change plan settings and then on Change advanced energy settings.
In this new tab, you can go much deeper into the settings by indicating, for example, the time you want the device to go into hibernation or change the critical level to which the battery can reach, among other details.
If you change your mind and want to delete the custom plan you have created, all you need to do is mark another plan you have available as the Balanced again and then enter Change power settings in the custom plan. Since it is not the default plan, Windows displays a new option to delete that plan.


