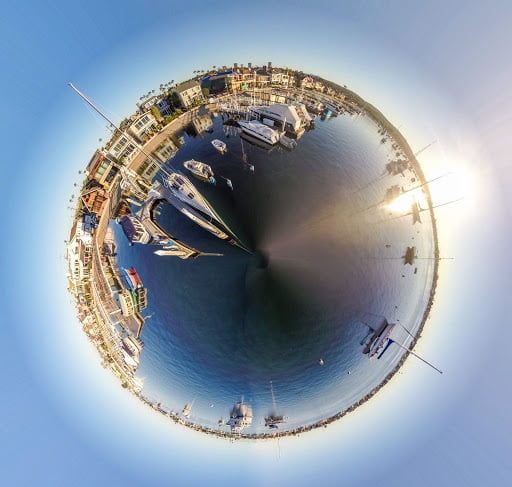
We show you how to make the tiny planet effect in photoshop, a fun effect and very easy to do thanks to the tools provided by Photoshop is the tiny planet effect, 360º panoramic or circular panoramic. Our panoramic photography becomes a kind of ball. An effect that we are sure you have seen on the Internet and that we are going to explain how to do it in a few simple steps.

Step 1. Symmetrical photography
The first thing to keep in mind is that our image must be as symmetrical as possible. We must also bear in mind that to perform this effect, the horizon line must be as straight as possible, have a sky as uniform as possible and that the ends are as similar as possible so as not to have to retouch the photograph too much. That is, not all photographs serve us. For this effect, the ideal photos are those of landscapes or city panoramas.
In the case of the image we have chosen for this example, we see that on the left side of the photo there is a river and on the right side we have buildings. To balance the image to our interest and for the tiny planet effect to work, we will move to eliminate the left area of our image by cloning the buildings that are lost on the horizon in the right area of the photograph.
Step 2. Retouch (clone buffer)
To perform this action, we use the Clone Stamp tool that is located in the tool panel on the right side of our screen. We will press the Alt key to activate the clone function and we will “paint” over the area that we are interested in retouching. We can use the Patch tool but it will depend on the type of photography and the precision with which we want to work.
Step 3. Adjust size (square image)
Once we have our image as symmetrical as possible, we have to modify the size. For this we will go to the top menu and click on Image> Image size. Once selected, a new window will open where we will see a series of values referring to the size of our image. The goal is to make our image square. This option is very simple, for this we have to match the Width and Height values of our image. In our case we have decided that it is 1200 pixels. By default, these values are modified proportionally so for Photoshop to allow us to change the size as we want, we have to deactivate the padlock by clicking on the link icon that we find to the left of the values.
Once this is done, our image will go from rectangular to square.
Step 4. Invert image (flip vertical)
Our photography is already in square format. The next step is to invert the position of the image. To do this we use a keyboard shortcut by pressing Control + T (Windows) or Cmd + T (Apple). After activating this option, we click the secondary button of our mouse and a small Transformation menu will appear. We chose Flip Vertical and our photo will be reversed immediately.
Step 5. Distort (polar coordinates)
The next step is to generate the distortion for the tiny planet effect. To do this we go to our top menu and click on Filter> Distort> Polar coordinates. Once this is done, the Polar Coordinates window appears with a preview of our image. At the bottom we have two options to choose from where we must select the Rectangular to polar option.
Step 6. Final adjustments
As we can see we already have our image with the tiny planet effect. Now we only have to correct the small imperfections that are seen in the union of the two ends of our photography. For this we can use the Patch tool or the Clone Stamp tool. As always, everything will depend on the type of photography we have used to create this effect.
In a few simple steps and very quickly we have created a fun effect on our photo and that can be used to make a poster or book cover, album or whatever you can think of. Not everything is serious in Photoshop and this type of tricks allows us to have fun and obtain interesting results.


